Thursday, October 23, 2014
10 Diagnostic Apps and Devices to Make You a Better Driver
10 Diagnostic Apps and Devices to Make You a Better Driver
Your car can tell you what it's up to under the hood—you just need the right tools to understand what it's saying. Hardwire yourself into the brains of your car with these 10 OBD-II apps and devices.
Since 1996, cars sold in the U.S. have been required to provide a connection for mechanics and inspectors to measure what's going on electronically under the hood. The system, called On-Board Diagnostics generation two (OBD-II), uses a 16-pin connector mounted somewhere near the instrument panel to gather information. If it detects faults, it transmits them in four-digit codes in four categories: P for powertrain, U for computer, C for chassis, and B for body.
That's great if you want to know why your Check Engine light is on. But how does this translate into having a little fun behind the wheel? Over the past half decade, there's been an explosion of aftermarket gadgets that allow the OBD-II connection to transmit useful stats, such as instant fuel economy, engine speed, temperature, and vehicle speed. Couple this valuable info with the accelerometers and GPS locating ability of common smartphones, and you can get a sophisticated view of your car's performance, efficency, and even your own driving prowess. Here are 10 of our favorite apps and devices for performance driving.
DevToaster's Rev
Price: $39.95 (requires additional OBD-II transmitter, about $150)
The coolest thing about the DevToaster Rev iPhone and OBD-II system, which won a Popular Mechanics Editor's Choice Award in 2009, is that it can tell you exactly how you're driving and how your car is behaving on a specific map. It will display how quickly or how efficiently you travel a challenging road by showing a graph of acceleration and braking forces, including lateral acceleration (g-forces). It's like having a driving instructor and vehicle performance measurement equipment along for every ride.
To start, you buy a wireless OBD-II data transmitter about the size of a matchbox and plug it into your car's OBD-II port. Then download the Rev application to your iPhone and you're ready. In addition to monitoring and graphing your performance behind the wheel, the Rev application also alerts you to problems and wear with your car, and a recently added feature allows you to reset your Check Engine warning light. Rev will also log your data so you can compare different trips in different cars, or check to see if the new intake or exhaust systems you just bolted on actually improves your performance.
PLX Kiwi Drive Green
Price: $199.95
The PLX Kiwi Drive Green is an efficiency driving coach that uses a stand-alone display and plugs into your car's OBD-II port using a cord. The device opens up a large menu of efficiency coaches, including a "Kiwi Score" game that tests your ability to get the best fuel economy possible. We gave the Kiwi Drive Green a Popular Mechanics Editors Choice Award back in 2008 for its forward-thinking approach. The Kiwi also measures fuel economy on separate trips, as well as how much fuel costs on each trip.
PLX Kiwi MPG
Price: $89.95
The PLX Kiwi MPG packs some of the same functions as the Kiwi Drive Green, but those mileage readings appear on much smaller digital display. It's a lot less expensive than the Drive Green, but you don't get the efficiency driving coach here. However, if your car didn't come with a trip computer or an instantaneous fuel-economy readout, then PLX Kiwi MPG will add those functions in a tiny unit that you can mount right on your instrument panel.
PLX Kiwi WiFi/Bluetooth
Price: $149.95/$99.95
These two OBD-II devices from PLX allow you to wirelessly connect to your car's computer with your iPhone, iPod Touch, or Android smartphone. The system lets you read engine and vehicle diagnostic codes through a free app. Like the DevToaster Rev, these devices let you track your car's performance over a particular course via GPS, and the faster connection of the iPhone WiFi model can even calculate lateral g-forces.
Car MD
Price: $70
The Car MD won't turn off your Check Engine light, but this easy-to-use gadget will find out which trouble code is making it illuminate and then take you to a website that explains the problem under the hood in plain English and suggests solutions specific to your vehicle. In addition, the software connects you to an online calculator that estimates the price of the repair. You can take the estimate to a repair shop to confirm the price.
GoPoint Technology GL1 Cable
Price: $99
This do-it-all OBD-II device won one of our Breakthrough Awards in 2010. The GoPoint connects with an iPhone or iPod Touch through a hardwired cable. (Some car enthusiasts prefer an old-school wired connection to eliminate possible interference or data-speed issues.) A similar app called BL1 uses a supplied Bluetooth transmitter for the same price. In addition to diagnosing faults and resetting the Check Engine light, the GoPoint GL1 provides a simple explanation to fault codes and displays real-time data on small graphics windows.
VoyagerDash
Price: $1.00 (also requires OBD-II Bluetooth adapter for Android phone, about $20 to $100)
The VoyagerDash is an Android app that, using a Bluetooth transmitter from the OBD-II port on your car, sends data to your smartphone. Then simply mount the phone on your car's dashboard and you can see either gauges that display your car's performance or bar graphs that show a record of performance over time. This application also lets you read trouble codes stored in the car's computer, though there is no function to reset the codes.
OBDroid
Price: $2.99 (requires an OBD-II Bluetooth transmitter, about $20 to $100)
The OBDroid, coupled with a Bluetooth connection to your car's OBD-II interface, is a fault-code reader that describes what the codes mean on an Android smartphone. It also displayd vehicle and engine speeds and intake airflow. And yes, it calculates fuel economy and resets Check Engine warning lights, too.
alOBD ScanGenPro
Price: $4.99 (requires an OBD-II Bluetooth transmitter, about $20 to $100)
This ungainly named app is preprogrammed with descriptions of error codes. The alOBD ScanGenPro displays real-time status of some sensor data in a digital format as well as a graph. It also stores and exports fault codes as well as specific vehicle parameters that are proprietary to some car manufacturers. And best of all, the alOBD can be customized for specific data captures.
Torque
Price: $4.95 (requires an OBD-II Bluetooth transmitter, about $20 to $100)
Torque. It's a very simple name for an app with quite a lot of capability. And it's been gaining popularity amongst car enthusiasts who own Android devices because it uses both Google Earth real-time car-performance displays and a calculated horsepower and torque measurement. Most important, it automatically records 0 to 60 mph sprints. Like diagnostic-only OBD-II devices, it also retrieves and resets fault codes, which is certainly helpful if you've modified your car.
Saturday, October 11, 2014
ZT: Creating an openflow enabled wireless router(D-Link DIR-615 E4)
http://kaarthek.wordpress.com/2014/02/03/creating-an-openflow-enabled-wireless-router-d-link-dir-615-e4-step-1/
Step 1: Installing OpenWRT via firmware reset in D-Link router OR restoring your D-Link router
Well this step actually took the longest time to implement :/
You see the router had no D-link firmware.The only option available was to upload a new firmware via the reset web interface.I initially thought that i would first reset my router by installing an official image(firmware) provided by D-Link.But to no avail.The router simply would not accept the D-Link images.
So i decided to directly upload the openwrt image from Openwrt.
And even this did not work immediately !! It seems that modern browsers dont work sometimes!!
I would recommend WAP users to use the openwrt firmware if their router firmware ever crashes(and your warranty’s expired).Its got a simple web interface (LUCI) thats very convenient to use and configuration is a piece of cake!
In this step i describe the method used to build the openwrt image with openflow package.The squashfs-sysupgrade images are present in the box widget.
I used instructions from both these links ( openwrt and Pantou) to build an image with following specifications.
1.Install the dependencies.
sudo apt-get install subversion build-essential libncurses5-dev zlib1g-dev gawk git ccache gettext libssl-dev xsltproc
2.Download Openwrt source and feeds
3.Get openwrt config file
IMPORTANT : DLINK as well as TPLINK uses ar71xx chipset.The config file for your router might vary.Download a different config if you are building for different hardware or a different version of OpenWRT.
Now edit the .config: set the CONFIG_SDK=n and CONFIG_MAKE_TOOLCHAIN=n to not build the SDK or the TOOLCHAIN.
4.Install the feeds
Create a Perl script at ~/openwrt/attitude_adjustment/config_install_feeds.pl:
Now run the script:
5.Disable unnecessary packages
Create the following script at ~/openwrt/attitude_adjustment/config_feeds_disable_packages.pl:
Run the script:
6.Configure OpenWRT
Here select the no. corresponding to your router.Answer n to all the queries.
7.Set up openflow package.
Select tplink branch for ar71xx devices.
8.Set up openflow package
9.Add the OpenFlow extensions to the Attitude Adjustment directory.
10.Add basic configuration files for OpenWRT
11.Configure build
12.You shall now see the following GUI (IMPORTANT)
The first build will take atleast a few hours.(Took 7-8 hours for me).To build an image for tp-link simply change the menuconfig file and select the correct target system.The second build will take much shorter time.
In this step, we upload the openwrt image we built.
If everything went fine the image will be present in ‘~/openwrt/attitude_adjustment/bin/ar71xx’ folder.
I strongly recommend installing the factory-squashfs version from official openwrt website.You could then configure your network settings.Also set your password and wifi security settings.So when you upload your image your network settings are preconfigured.Check the keep settings option as shown.
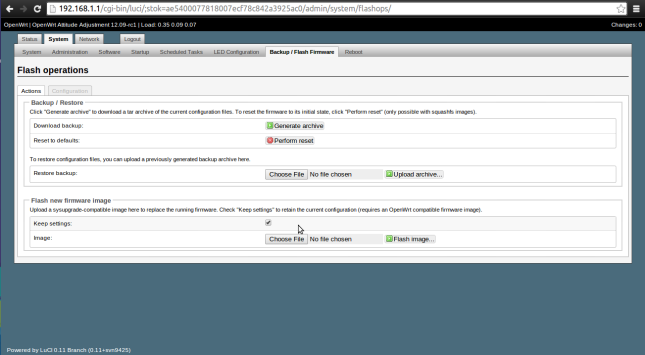
Here select ‘openwrt-ar71xx-generic-dir-615-e4-squashfs-sysupgrade.bin‘.
Once you upload this image you can access your router via ssh only.Open your command prompt and type
Enter the password you had set.You must now see the following screen.
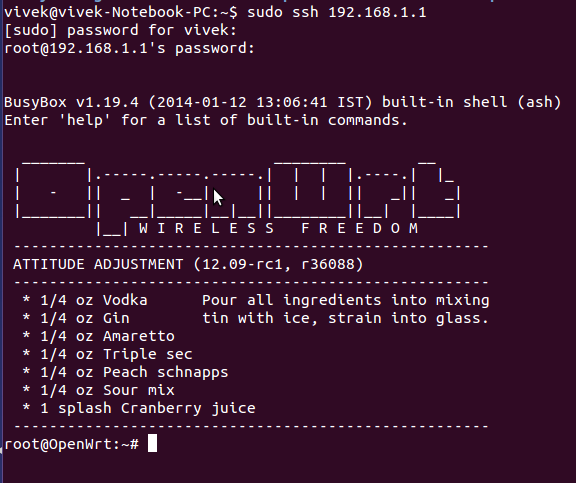
Now install Luci by following the instructions given here.
This step describes the configuration required to get openflow up and running.
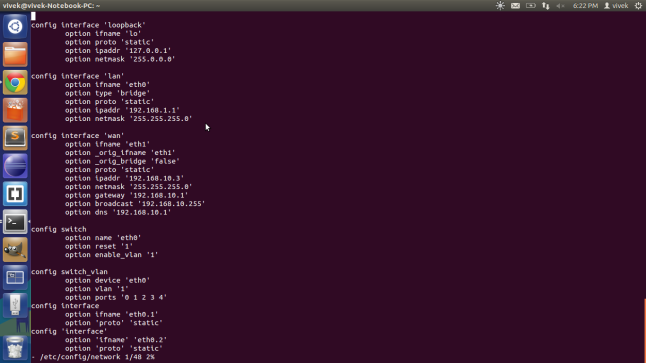
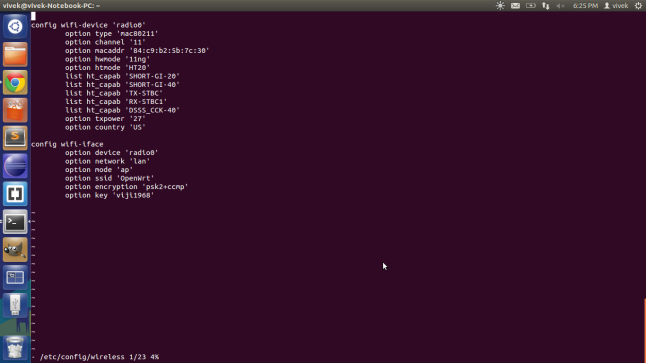
Primarily you need to edit 3 files to get openflow working.The files are..
(Note: These are files that worked for me.My router is a dhcp client connected to an ADSL modem.Your file configuration might vary)
Add interface config for eth0.3,eth0.4 and wlan0 too.
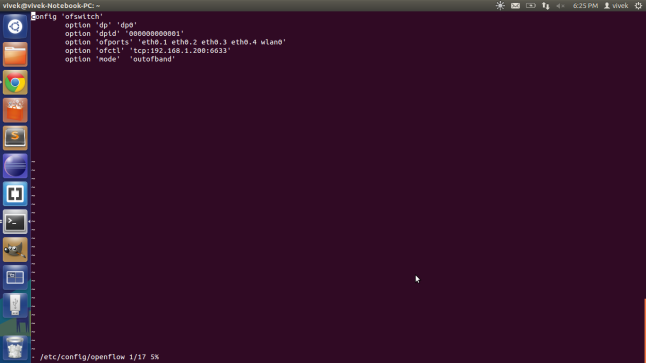
The file for inband control is as shown.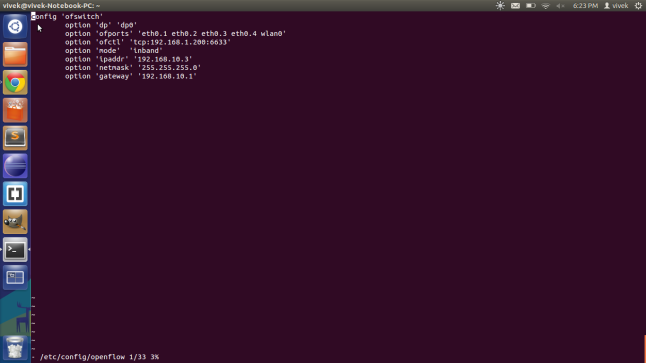
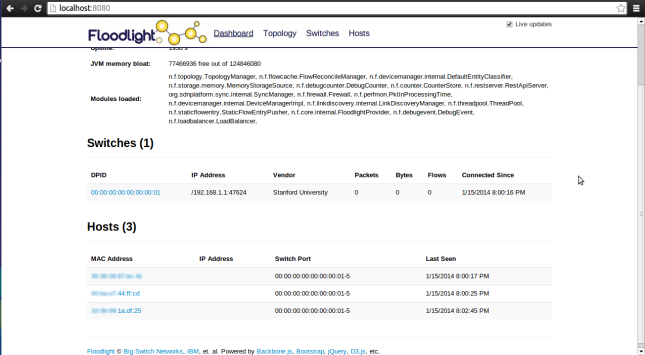
Start your floodlight controller via eclipse.
Here you must be able to view your switch if you have configured everything correctly.
Step 1: Installing OpenWRT via firmware reset in D-Link router OR restoring your D-Link router
Well this step actually took the longest time to implement :/
You see the router had no D-link firmware.The only option available was to upload a new firmware via the reset web interface.I initially thought that i would first reset my router by installing an official image(firmware) provided by D-Link.But to no avail.The router simply would not accept the D-Link images.
So i decided to directly upload the openwrt image from Openwrt.
And even this did not work immediately !! It seems that modern browsers dont work sometimes!!
- I had to disconnect my ubuntu lappy and connect the router to the windows PC.
- Next,I installed firefox portable on my windows PC.
- I uploaded the following image ‘openwrt-ar71xx-dir-615-c1-squashfs-factory.bin’ and this… finally got my dysfunctional router working :) !!
I would recommend WAP users to use the openwrt firmware if their router firmware ever crashes(and your warranty’s expired).Its got a simple web interface (LUCI) thats very convenient to use and configuration is a piece of cake!
In this step i describe the method used to build the openwrt image with openflow package.The squashfs-sysupgrade images are present in the box widget.
I used instructions from both these links ( openwrt and Pantou) to build an image with following specifications.
- Openflow version:1.0
- OpenWRT version: Attitude Adjustment
- OS used : Ubuntu 12.04
1.Install the dependencies.
sudo apt-get install subversion build-essential libncurses5-dev zlib1g-dev gawk git ccache gettext libssl-dev xsltproc
2.Download Openwrt source and feeds
 mkdir ~/openwrt

cd ~/openwrt

svn co -r 36088 svn://svn.openwrt.org/openwrt/branches/attitude_adjustment

cd attitude_adjustment

./scripts/feeds update -a
3.Get openwrt config file
 cd ~/openwrt/attitude_adjustment

rm .config

wget 'http://downloads.openwrt.org/attitude_adjustment/12.09-rc1/ar71xx/generic/config.ar71xx_generic'

ln -s config.ar71xx_generic .config
IMPORTANT : DLINK as well as TPLINK uses ar71xx chipset.The config file for your router might vary.Download a different config if you are building for different hardware or a different version of OpenWRT.
Now edit the .config: set the CONFIG_SDK=n and CONFIG_MAKE_TOOLCHAIN=n to not build the SDK or the TOOLCHAIN.
4.Install the feeds
Create a Perl script at ~/openwrt/attitude_adjustment/config_install_feeds.pl:
#!/usr/bin/perl

use warnings;

use strict;

open(CONFIG_FILE, '<', ".config");

while(<CONFIG_FILE>)

{

if( $_ =~ /^CONFIG_PACKAGE_(.+?)=y/)

{

my $feed = $1;

print("./scripts/feeds install $feed\n");

system("./scripts/feeds install $feed");

}

}
Now run the script:
 cd ~/openwrt/attitude_adjustment

chmod 755 config_install_feeds.pl

./config_install_feeds.pl
5.Disable unnecessary packages
Create the following script at ~/openwrt/attitude_adjustment/config_feeds_disable_packages.pl:
#

!/usr/bin/perl

use warnings;

use strict;

open(CONFIG_FILE, '<', ".config");

while(<CONFIG_FILE>)

{

chomp;

if( $_ =~ /^CONFIG_PACKAGE_(.+?)=m$/)

{

print("CONFIG_PACKAGE_$1=n\n");

}

else

{

print("$_\n");

}

}
Run the script:
cd ~/openwrt/attitude_adjustment

chmod 755 config_feeds_disable_packages.pl

./config_feeds_disable_packages.pl > ./.config.new

mv ./.config.new ./.config
6.Configure OpenWRT
make oldconfigHere select the no. corresponding to your router.Answer n to all the queries.
7.Set up openflow package.
Select tplink branch for ar71xx devices.
cd ~/openwrt/

git clone git://gitosis.stanford.edu/openflow-openwrt
8.Set up openflow package
 cd openflow-openwrt

git checkout -b openflow-1.0/tplink origin/openflow-1.0/tplink
9.Add the OpenFlow extensions to the Attitude Adjustment directory.
cd ~/openwrt/attitude_adjustment/package/

ln -s ~/openwrt/openflow-openwrt/openflow-1.0/
10.Add basic configuration files for OpenWRT
cd ~/openwrt/attitude_adjustment/

ln -s ~/openwrt/openflow-openwrt/openflow-1.0/files
11.Configure build
cd ~/openwrt/attitude_adjustment

make menuconfig
12.You shall now see the following GUI (IMPORTANT)
- Select your platform for Target System (Atheros AR71xx)
- Select your platform at Target Profile (i.e. D-Link-DIR-615)
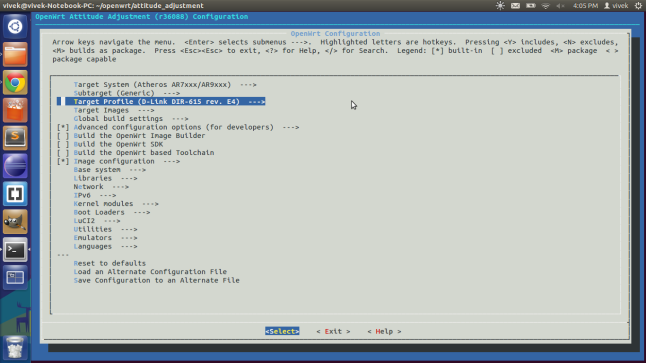
- Select OpenFlow package under network
- Select tc package under network
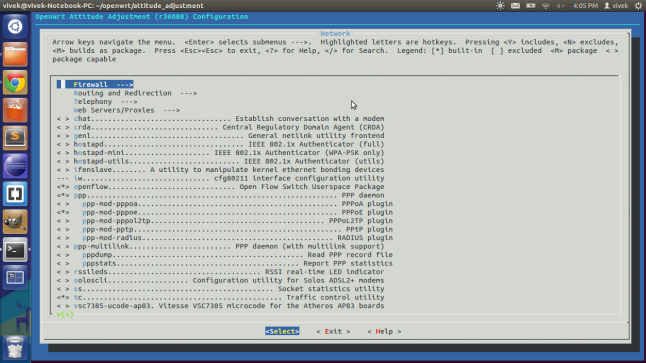
- Select kmod-tun under Kernel Modules->Network Support
- Save and Exit
make kernel_menuconfig- Under Networking Support->Networking options->QoS and/or fair queueing select Hierarchical Token Bucket (HTB)
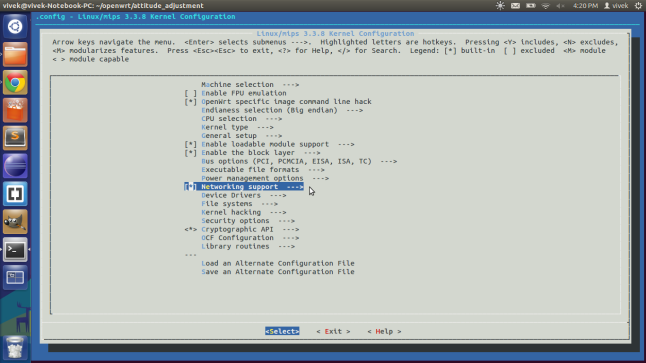
- Save and Exit
cd attitude_adjustment

make V=s
The first build will take atleast a few hours.(Took 7-8 hours for me).To build an image for tp-link simply change the menuconfig file and select the correct target system.The second build will take much shorter time.
In this step, we upload the openwrt image we built.
If everything went fine the image will be present in ‘~/openwrt/attitude_adjustment/bin/ar71xx’ folder.
I strongly recommend installing the factory-squashfs version from official openwrt website.You could then configure your network settings.Also set your password and wifi security settings.So when you upload your image your network settings are preconfigured.Check the keep settings option as shown.

Here select ‘openwrt-ar71xx-generic-dir-615-e4-squashfs-sysupgrade.bin‘.
Once you upload this image you can access your router via ssh only.Open your command prompt and type
sudo ssh 192.168.1.1Enter the password you had set.You must now see the following screen.

Now install Luci by following the instructions given here.
This step describes the configuration required to get openflow up and running.
Primarily you need to edit 3 files to get openflow working.The files are..
(Note: These are files that worked for me.My router is a dhcp client connected to an ADSL modem.Your file configuration might vary)
Add interface config for eth0.3,eth0.4 and wlan0 too.

The file for outband control.

- ofctl – address of my machine(LAN side).6633 is the default port of my floodlight controller.
- ipaddr – address of my router (WAN side)
- gateway- address of my modem.
/etc/init.d/network restart

 /etc/init.d/openflow restart
Start your floodlight controller via eclipse.
Here you must be able to view your switch if you have configured everything correctly.

ZT: OpenWRT c,c++ programing
http://fleshandmachines.wordpress.com/2011/08/22/openwrt-cc-programing/
First we need a developer platform or an SDK. I used my PC with Ubuntu for that.
Second we have to download the SDK that’s suit for us. What kind of SDK we need? It depends on the hardware that we use for running the OpenWRT. I have two OpenWRT compatible router the first is a Linksys WRT54GL, second is a WRT160NL. They have different architecture but that’s not a big problem.
The WRT54GL have Broadcom BCM5352, so I use brcm-2.4 .
The WRT160NL have a Atheros AR9130 rev 2, so I use ar71xx for that one.
Th latest OpenWRT release (when I write this post) is /backfire/10.03.1-rc5 . If I want my SDK for WRT54GL here can be found: http://downloads.openwrt.org/backfire/10.03.1-rc5/brcm-2.4/OpenWrt-SDK-brcm-2.4-for-Linux-i686-gcc-3.4.6_uClibc-0.9.30.1.tar.bz2
and for WRT160NL http://downloads.openwrt.org/backfire/10.03.1-rc5/ar71xx/OpenWrt-SDK-ar71xx-for-Linux-i686-gcc-4.3.3+cs_uClibc-0.9.30.1.tar.bz2. Now we have to download the one that’s fit for our project. After that we unpack the tar. We are done for this part, let’s do the coding.
C version:
Here is what look like an ordinary c code:
/****************
* Helloworld.c
* A test code.
*****************/
#include \

int main(void)
{
 printf("Hello world!");
 return 0;
}
# build helloworld executable when user executes "make"
helloworld: helloworld.o
 $(CC) $(LDFLAGS) helloworld.o -o helloworld
helloworld.o: helloworld.c
 $(CC) $(CFLAGS) -c helloworld.c

# remove object files and executable when user executes "make clean"
clean:
 rm *.o helloworld
##############################################
# OpenWrt Makefile for helloworld program
#
#
# Most of the variables used here are defined in
# the include directives below. We just need to
# specify a basic description of the package,
# where to build our program, where to find
# the source files, and where to install the
# compiled program on the router.
#
# Be very careful of spacing in this file.
# Indents should be tabs, not spaces, and
# there should be no trailing whitespace in
# lines that are not commented.
#
##############################################

include $(TOPDIR)/rules.mk

# Name and release number of this package
PKG_NAME:=helloworld
PKG_RELEASE:=1


# This specifies the directory where we're going to build the program.
# The root build directory, $(BUILD_DIR), is by default the build_mipsel
# directory in your OpenWrt SDK directory
#PKG_BUILD_DIR := $(BUILD_DIR)/$(PKG_NAME)


include $(INCLUDE_DIR)/package.mk


# Specify package information for this program.
# The variables defined here should be self explanatory.
# If you are running Kamikaze, delete the DESCRIPTION
# variable below and uncomment the Kamikaze define
# directive for the description below
define Package/helloworld
   SECTION:=utils
   CATEGORY:=Utilities
   TITLE:=Helloworld -- prints a snarky message
endef

define Package/helloworld/description
 It is a helloworld.
endef

# Uncomment portion below for Kamikaze and delete DESCRIPTION variable above
#define Package/helloworld/description
#endef


# Specify what needs to be done to prepare for building the package.
# In our case, we need to copy the source files to the build directory.
# This is NOT the default.  The default uses the PKG_SOURCE_URL and the
# PKG_SOURCE which is not defined here to download the source from the web.
# In order to just build a simple program that we have just written, it is
# much easier to do it this way.
define Build/Prepare
 mkdir -p $(PKG_BUILD_DIR)
 $(CP) ./src/* $(PKG_BUILD_DIR)/
endef


# We do not need to define Build/Configure or Build/Compile directives
# The defaults are appropriate for compiling a simple program such as this one


# Specify where and how to install the program. Since we only have one file,
# the helloworld executable, install it by copying it to the /bin directory on
# the router. The $(1) variable represents the root directory on the router running
# OpenWrt. The $(INSTALL_DIR) variable contains a command to prepare the install
# directory if it does not already exist.  Likewise $(INSTALL_BIN) contains the
# command to copy the binary file from its current location (in our case the build
# directory) to the install directory.
define Package/helloworld/install
 $(INSTALL_DIR) $(1)/bin
 $(INSTALL_BIN) $(PKG_BUILD_DIR)/helloworld $(1)/bin/
endef


# This line executes the necessary commands to compile our program.
# The above define directives specify all the information needed, but this
# line calls BuildPackage which in turn actually uses this information to
# build a package.
$(eval $(call BuildPackage,helloworld))
Now we have to copy the helloworld folder to the sdk, in the package subfolder. Then use the make command in the SDK folder. If there are problems, we have use the make V=99 command, it will show where might we find the source of the bug. If there wasn’t any problem we can find the binary package at the SDK/bin/packages/mipsel. Now copy the package to the openwrt. For linux you might use: scp helloworld_1_mipsel.ipk root@192.168.1.100: For windows you can use WinScp. If you uploaded the file, you have to ssh to the OpenWRT or the router and use this command
opkg intall helloworld_1_mipsel.ipk . More about OPKG. Only one thing is left, to run the file, we have use helloworld command. If everything was ok, then we see this at console: Hello world! And the C++ version
The C++ version has just a little difference. You have to write a c++ code. Here is what I preprared:
Helloworldcxx.cpp:
/****************
* Helloworldcxx.cpp
*****************/
#include ;

using namespace std;

int main()
{
        cout << "Hello world!\n\n";
 return 0;
}
# build helloworldcxx executable when user executes "make"
helloworldcxx: helloworldcxx.o
 $(CXX) $(LDFLAGS) helloworldcxx.o -o helloworldcxx
helloworldcxx.o: helloworldcxx.cpp
 $(CXX) $(CXXFLAGS) -c helloworldcxx.cpp

# remove object files and executable when user executes "make clean"
clean:
 rm *.o helloworldcxx
Makefile:
##############################################
# OpenWrt Makefile for helloworldcxx program
#
#
# Most of the variables used here are defined in
# the include directives below. We just need to
# specify a basic description of the package,
# where to build our program, where to find
# the source files, and where to install the
# compiled program on the router.
#
# Be very careful of spacing in this file.
# Indents should be tabs, not spaces, and
# there should be no trailing whitespace in
# lines that are not commented.
#
##############################################

include $(TOPDIR)/rules.mk

# Name and release number of this package
PKG_NAME:=helloworldcxx
PKG_RELEASE:=1


# This specifies the directory where we're going to build the program.
# The root build directory, $(BUILD_DIR), is by default the build_mipsel
# directory in your OpenWrt SDK directory
#PKG_BUILD_DIR := $(BUILD_DIR)/$(PKG_NAME)


include $(INCLUDE_DIR)/package.mk


# Specify package information for this program.
# The variables defined here should be self explanatory.
# If you are running Kamikaze, delete the DESCRIPTION
# variable below and uncomment the Kamikaze define
# directive for the description below
define Package/helloworldcxx
   SECTION:=utils
   CATEGORY:=Utilities
   TITLE:=helloworldcxx -- prints a snarky message
endef

define Package/helloworldcxx/description
 It is a helloworldcxx.
endef


# Specify what needs to be done to prepare for building the package.
# In our case, we need to copy the source files to the build directory.
# This is NOT the default.  The default uses the PKG_SOURCE_URL and the
# PKG_SOURCE which is not defined here to download the source from the web.
# In order to just build a simple program that we have just written, it is
# much easier to do it this way.
define Build/Prepare
 mkdir -p $(PKG_BUILD_DIR)
 $(CP) ./src/* $(PKG_BUILD_DIR)/
endef


# We do not need to define Build/Configure or Build/Compile directives
# The defaults are appropriate for compiling a simple program such as this one


# Specify where and how to install the program. Since we only have one file,
# the helloworldcxx executable, install it by copying it to the /bin directory on
# the router. The $(1) variable represents the root directory on the router running
# OpenWrt. The $(INSTALL_DIR) variable contains a command to prepare the install
# directory if it does not already exist.  Likewise $(INSTALL_BIN) contains the
# command to copy the binary file from its current location (in our case the build
# directory) to the install directory.
define Package/helloworldcxx/install
 $(INSTALL_DIR) $(1)/bin
 $(INSTALL_BIN) $(PKG_BUILD_DIR)/helloworldcxx $(1)/bin/
endef


# This line executes the necessary commands to compile our program.
# The above define directives specify all the information needed, but this
# line calls BuildPackage which in turn actually uses this information to
# build a package.
$(eval $(call BuildPackage,helloworldcxx))
There is only thing left to run the package, we have to install the libstdcpp package. This package is big, this is why it’s not standard installed. If you lack of storage space, you might use just c code. There are plenty of ways to have plus storage on the router, it’s depending on the resources what we have. For example you can use a pendrive if you have a router with USB port. Or you can use flashdrive, but you have to create the interface for that, there are many good tutorials how to do that. So if you have confidence in your self you can create a flashdrive port.
The good part is in creating a program in OpenWRT is if you have written good code, and you want to use it on a different architechture, all you have to do is to download it’s SDK, and compile the code with that.
Here is the tutorial that’s what I used for the first time to write code and to write my tutorial. Thanks the Gargoyle guys for their tutorial, it helped me a lot :].
ZT: OpenWRT and Quagga For Dynamic Router
OpenWRT and Quagga For Dynamic Router
Adding Quagga to OpenWRT for Dynamic Routing
http://www.air-stream.org.au/OpenWrtQuaggaInstall Quagga
ipkg install quagga
ipkg install quagga-zebra
ipkg install quagga-bgpd
Configure Quagga
vi /etc/quagga/zebra.conf
vi /etc/quagga/bgpd.conf
Add PID files
touch /var/bgpd.pid
chmod 777 /var/bgpd.pid
touch /var/zebra.pid
chmod 777 /var/zebra.pid
Check Init files
/etc/init.d/S35quagga
一个小型的无线路由器 Linux 系统OpenWRT
一个小型的无线路由器 Linux 系统OpenWRT
作者: Cody Teng网址: http://www.eosp.org
郵箱: cody@eosp.org
OpenWRT - (http://www.openwrt.org)
开发板: 十几种市面上很容易买到的无线路由器,价钱500元左右, 请看硬件列表: (http://wiki.openwrt.org/TableOfHardware)
我使用的是 Linksys WRT54G:
CPU: MIPS 200MHZ
内存: 16M
ROM: 4M
网络接口: 4个LAN, 1个WAN, 1个Wireless Lan
已加接SD Card, 双串口和JTAG
详细请看这里: (http://www.eosp.org/?page_id=20)
在开发前可先安装使用jffs2(可读写)文件系统的Firmware, 了解系统架构, 安装软件, 内建HTTP, DHCP, DNS, SSH, Telnet, PPPOE, PPTP等, 有WEB界面,
另外可加装软件有7百多个选择, 包括Samba, mysql, OpenVPN, Asterisk,
软件列表:
http://tracker.openwrt.org/packages/
到熟悉后使用Buildroot 做交叉编译等工作, 自后打包软件, 制作自己的Firmware, 进入嵌入式Linux 的世界.
学习后还可以继续充当家里无线路由器的角色, 或你改装后的小型Linux服务器!!!
这是安装 OpenWRT 的步驟
注: 转贴时请保持文章的完整性.
在安装 OpenWrt 之前,首先你要知道你所使用的无线路由器 OpenWrt 是否支持,在 OpenWrt 的网页上提供了一个路由器列表,地址是:
http://wiki.openwrt.org/TableOfHardware 。
当中最多人使用的是 Linksys WRT54G/GS 和 ASUS WL-500G,相关的文档也较多,Linksys在前面已经介绍过,我在这里不再重复了,其次是 ASUS WL-500G, 原因是它在市面容易找到,而且支持 USB,即使价钱比一般的无线路由器贵1百多元,也相当值得,有了USB,你可以接上一个掫像头,移动盘,硬盘和打印机等设备。接下来我会说明 OpenWrt 在 WRT54G上的安装过程。
首先,到 OpenWrt 下载 Firmware,地址是:
http://downloads.openwrt.org/whiterussian/rc4/bin/
OpenWrt 提供很多版本的 Firmware下载,例如 openwrt-brcm-2.4-jffs2-4MB.trx,其中brcm是通用版本,如果你ASUS的路由器就属于这类;2.4是所使用的 Kernel版本;jffs2是文件系统,文件系统有2种,jffs2是可读写的,没有压缩,文件较大,squashfs是只读的,由于是压缩文件系统, 这意味着在相同大小的 Flash Rom 你可以安装更多软件;4MB是 Flash Rom 大小,这根据你使用的路由器版本而定,请参考刚才的路由器列表。下面是现时 OpenWrt提供的 Firmware:
[ ] openwrt-brcm-2.4-jffs2-4MB.trx 14-Sep-2005 19:21 2.1M
[ ] openwrt-brcm-2.4-jffs2-8MB.trx 14-Sep-2005 19:21 2.1M
[ ] openwrt-brcm-2.4-squashfs.trx 14-Sep-2005 19:21 1.5M
[ ] openwrt-motorola-jffs2-4MB.bin 14-Sep-2005 19:21 2.1M
[ ] openwrt-motorola-jffs2-8MB.bin 14-Sep-2005 19:21 2.1M
[ ] openwrt-motorola-squashfs.bin 14-Sep-2005 19:21 1.5M
[ ] openwrt-wrt54g-jffs2.bin 14-Sep-2005 19:21 2.1M
[ ] openwrt-wrt54g-squashfs.bin 14-Sep-2005 19:21 1.5M
[ ] openwrt-wrt54gs-jffs2.bin 14-Sep-2005 19:21 2.1M
[ ] openwrt-wrt54gs-squashfs.bin 14-Sep-2005 19:21 1.5M
[ ] openwrt-wrt54gs_v4-jffs2.bin 14-Sep-2005 19:21 2.1M
[ ] openwrt-wrt54gs_v4-squashfs.bin 14-Sep-2005 19:21 1.5M
我用的是WRT54G v2.2版,所以我下载了 openwrt-wrt54gs-jffs2.bin,有了这文件后,我可以开始设定我的路由器了。WRT54G 默认的 IP 是 192.168.1.1,在接上你的电脑之前,你要更改你电脑的网络设定,把你电脑改为固定IP,IP是192.168.1.xxx,掩码是 255.255.255.0。然后用网络线把你的电脑和 WRT54G 其中一个 LAN 接口连起来,这时候你可以在 DOS PROMPT 中输入 “ping 192.168.1.1” 这命令,如果有回应的话就证明连线没有问题,如果出现 “Request Time Out” ,请检查一下你的防火墙和网线有没有问题(不要忘了为WRT54G接上电源)。
安装 OpenWrt 有几种方法,在不拆开路由器的情况下,最简单的方法是利用TFTP 软件,把整个 OpenWrt Firmware 更新到 WRT54G 的 Flash Rom里,
现在请打开你的浏览器,在网址一栏输入“http://192.168.1.1”,这时候应该会出现一个登入画面,用户和密码都是“admin”,如果你 的路由器是新买回来的话,请先把WAN设定好,你可以随便给一个固定IP,但不要设定DHCP,因为如果WAN接口没有连线而且没有IP的话,接下来我们 的PING工具将无法使用,我们会利用“PING”工具的一个小BUG,更改[/url] WRT54G 的 BOOTWAIT 设定,让我们可以把 Firmware上传到TFTP服务器。操作如下:
1. 打开 ping工具,“administration” --> “diagnostics” --> “Ping”,又或者在网址一栏输入 “192.168.1.1/ping.asp”
2. 在 “IP Address”一栏中,顺序输入下面4行指令,每输入一行就按一下“PING”按钮:
;cp${IFS}*/*/nvram${IFS}/tmp/n
;*/n${IFS}set${IFS}boot_wait=on
;*/n${IFS}commit
;*/n${IFS}show>tmp/ping.log
当最后一行输入后,你会看到一堆文字,如果你看到其中一行是“boot_wait=on”的话,你可以继续下一步了。
3. 把你的 WRT54G 电源拔出来,然后准备好刚才的 Firmware,在Windows的DOS PROMPT,输入这条命令,但不要按 “ENTER”:
tftp -i 192.168.1.1 PUT C:\openwrt-wrt54gs-jffs2.bin
*这里,我把openwrt-wrt54gs-jffs2.bin放在 C:\ ,如果你放在别的位置,请按你的情况更改
4. 一边接上 WRT54G 的电源,同时另一边按 “ENTER” ,如果成功的话,你会看见 WRT54G上 的 DMZ 灯不停闪动,而且画面会出现类似下面的讯息:
Transfer successful: 1537024 bytes in 6 seconds, 256170 bytes/s
5. 等待 2-3 分钟后,DMZ 灯会停止闪动,这时执行 “telnet 192.168.1.1”,如果出现 OpenWrt 的欢迎画面,代表你安装成功了。
Trying 192.168.1.1...
Connected to 192.168.1.1.
Escape character is '^]'.
BusyBox v1.00 (2004.12.24-03:19+0000) Built-in shell (ash)
Enter 'help' for a list of built-in commands.
_______ ________ __
| |.-----.-----.-----.| | | |.----.| |_
| - || _ | -__| || | | || _|| _|
|_______|| __|_____|__|__||________||__| |____|
|__| W I R E L E S S F R E E D O M
root@OpenWrt:/#
NVRAM 全名是 Non-Volatile Ram ,在 OpenWrt 里是用了 Flash Rom 最后的 64K 区块,用来储存一些环境参数,OpenWrt 通过这些参数来配置网络,DHCP,DNS和记载硬件版本等。
常用的 nvram 指令有以下 4 种:
1. nvram show
列出 NVRAM 内所有参数,我们亦可以用 grep 命令来抽取部份资讯,例如
nvram show | grep lan_
这命令列出了所以用 lan_ 开头的参数,结果如下:
lan_gateway=192.168.1.254
dr_lan_rx=0
lan_netmask=255.255.255.0
lan_lease=86400
lan_stp=1
lan_hwaddr=00:12:17:E1:56:F5
lan_dns=211.152.179.7 202.96.128.86
lan_ifnames=vlan0 eth1
size: 12567 bytes (20201 left)
lan_ipaddr=192.168.1.1
lan_proto=static
lan_ifname=br0
lan_wins=
lan_hwnames=
2. nvram set 参数=数值
用来添加或修改一些参数,例如我想把 LAN 的 IP 由 192.168.1.1 改为 192.168.1.2,可执行:
nvram set lan_ipaddr=192.168.1.2
nvram commit
reboot
第 1 行是修改 IP 地址,第 2 行是保存,第 3 行是重新启动 OpenWrt ,因为更改 IP 地址后要重启才能生效。
3. nvram unset 参数
用来删除一些参数,不过这个功能很少用到,因为 NVRAM 的 64K 容量足够保存大量参数,大部份人都赖得去删。
例如我想删除 “dr_lan_rx=0” 这个参数,请执行:
nvram unset dr_lan_rx
4. nvram commit
当你对 NVRAM 做了一大堆修改后,你需要把这些修改保存起来,否则你的路由器 RESET 后,这些修改便没有了,和上面一样,这时你要执行:
nvram commit
1. WRT54G 的网络概况
下面是 WRT54G 的内部结构示意图:
WRT54G由包括LAN,WAN,WIFI 等 3 部份组成,相等于图中的vlan0,vlan1,eth0。
http://www.eosp.org/wp-content/photo...chitecture.png
当你安装好 OpenWrt 后,NVRAM 里的默认配置是这样的:
lan_ifname=br0
lan_ifnames=”vlan0 eth1”
lan_proto=static
lan_ipaddr=192.168.1.1
lan_netmask=255.255.255.0
wan_ifname=vlan1
wan_proto=dhcp
第 1 项 lan_ifname=br0 是指 LAN 的网络介面名称;
第 2 项 lan_ifnames=”vlan0 eth1” 是指实际上 LAN 的真正网络介面,这里包括 vlan0(Port 1-4) 和 eth1 (无线网卡接口) ;
第 3 项 lan_proto=static 是指 LAN 用固定 IP 方式;
第 4 项 lan_ipaddr=192.168.1.1 指定了 LAN 的 IP 是 192.168.1.1;
第 5 项 lan_netmask=255.255.255.0 指定了 LAN 的子网络掩码;
第 6 项 wan_ifname=vlan1 指定了 WAN 的网络为 vlan1 (Port 0);
第 7 项 wan_proto=dhcp 指定了 WAN 的网络方式为 DHCP;
2. 配置 Lan 网络参数
假设我想修改路由器的 TCP/IP 设定为:
IP: 192.168.0.1
掩码: 255.255.255.0
网关: 192.168.0.254
DNS1: 192.168.0.254
DNS2: 202.14.67.4
并打开 DHCP 服务,IP 范围由 192.168.0.100 至 192.168.0.150;可以执行以下命令:
nvram set lan_proto=static
nvram set lan_ipaddr=192.168.0.1
nvram set lan_netmask=255.255.255.0
nvram set lan_gateway=192.168.0.254
nvram set lan_dns=’192.168.0.254 202.14.67.4’
nvram set dhcp_start=100
nvram set dhcp_num=50
nvram commit
reboot
第 1 项 nvram set lan_proto=static 是指 LAN 的网络方式为固定 IP
第 2 项 nvram set lan_ipaddr=192.168.0.1 是指定 LAN 的 IP 地址为 192.168.0.1
第 3 项 nvram set lan_netmask=255.255.255.0 是指定 LAN 的子网络掩码为 255.255.255.0
第 4 项 nvram set lan_gateway=192.168.0.254 是指定 LAN 的网关为 192.168.0.254
第 5 项 nvram set lan_dns=’192.168.0.254 202.14.67.4’ 是指定 LAN 使的 DNS 服务器,由于DNS服务器有 2 个,所以用空格来分开。
第 6 项 nvram set dhcp_start=100 是指 DHCP 服务器从 192.168.0.100 开始派发 IP
第 7 项 nvram set dhcp_num=50 是指 DHCP 从 192.168.0.100 开始 派发到 192.168.0.150 (100+50) 为止。
3. 设定WAN
一般常见的上网方式有3种: DHCP, PPPOE 拨号上网 及 STATIC IP(固定 IP)
2.1 DHCP
DHCP很简单,你只需告诉路由器用DHCP来上网,它便会替你自动取得IP,网络掩码,网关,DNS等资料
nvram set wan_proto=dhcp
nvram commit
reboot
2.2 固定 IP
很多商用宽带都是使用固定 IP,ISP 会提供 IP 地址(第2项),子网络掩码(第3项),网关(第4项)及DNS(第5项)资料,DNS如果超过一个的话用空格分开。
nvram set wan_proto=static
nvram set wan_ipaddr=218.103.124.24
nvram set wan_netmask=255.255.255.252
nvram set wan_gateway=218.103.124.23
nvram set wan_dns=’210.80.60.1 210.80.60.2’
nvram commit
reboot
2.3 PPPOE
PPPOE 在家用宽带是很常见的,ISP会提供 用户名及密码,你只需把下面第5和第6项换成相应的用户名及密码就可以用PPPOE上网了。
nvram set wan_ifname=ppp0
nvram set wan_proto=pppoe
nvram set ppp_mtu=1492
nvram set pppoe_ifname=vlan1
nvram set ppp_username=your_isp_login
nvram set ppp_passwd=your_isp_password
nvram commit
reboot
第 1 项 nvram set wan_ifname=ppp0 是指 WAN 使用 ppp0 网络介面来拨号上网
第 2 项 nvram set wan_proto=pppoe 是指 WAN 使用 PPPOE 的方式上网
第 3 项 nvram set ppp_mtu=1492 指定 MTU 为 1492
第 4 项 nvram set pppoe_ifname=vlan1 指 PPPOE 拨号的介面是 vlan1
第 5 项 nvram set ppp_username=your_isp_login 指定PPPOE 的用户名是 your_isp_login
第 6 项 nvram set ppp_passwd=your_isp_password 指定了 PPPOE 的密码是 your_isp_password
4. 配置无线网络
nvram set wl0_gmode=
nvram set wl0_ssid=
nvram set wl0_channel=
nvram set wl0_closed=
nvram commit
wifi up
关闭 WEP 和 WPA
nvram set wl0_wep=disabled
nvram set wl0_akm=open
开启WEP
nvram set wl0_wep=
nvram set wl0_wep_bit=
nvram set wl0_key=
nvram set wl0_key1=
nvram set wl0_key2=
nvram set wl0_key3=
nvram set wl0_key4=
nvram set security_mode_last=wep
nvram commit
ifdown wifi
ifup wifi
WPA
nvram unset wl0_auth_mode
nvram set wl0_akm=psk
nvram set wl0_crypto=
nvram set wl0_wpa_psk=
nvram set wl0_radius_key=
nvram set wl0_radius_ipaddr=
nvram set wl0_radius_port=
nvram set security_mode_last=wpa
nvram commit
无线网络 – MAC Filter
nvram set wl0_macmode=allow
nvram set wl0_mac_list=
nvram set wl0_mac_deny=
nvram commit
wifi up
5. 加强 OpenWrt 的安全性
我认为没有密码和使用 Telnet 是不安全的,OpenWrt 在设定密码后会把 Telnet 关闭,改用 SSH 服务
passwd
ipkg 是 OpenWrt 内的一个软件安装管理工具,在 OpenWrt 内输入
root@Linksys:~# ipkg
你会得到 ipkg 的说明和帮助,接下来我会说明 ipkg 常用的几个命令:
1. ipkg update
ipkg 会到 http://downloads.openwrt.org/whiterussian/packages/ 下载并更新最新的软件包列表(这个列表的位置在/etc/ipkg.conf指定):
root@Linksys:~# ipkg update
Downloading http://downloads.openwrt.org/whiteru...kages/Packages
Updated list of available packages in /usr/lib/ipkg/lists/whiterussian
Downloading http://downloads.openwrt.org/whiteru...-free/Packages
Updated list of available packages in /usr/lib/ipkg/lists/non-free
Successfully terminated.
2. ipkg list
在更新之后,我们可以用 ipkg list 这命令查看一下有什么软件包可供安装,这里我会列出部份结果:
root@Linksys:~# ipkg list
aiccu – 2005.01.31-1 – SixXS Automatic IPv6 Connectivity Client Utility
arptables – 0.0.3-1 – ARP firewalling software
arpwatch – 2.1a11-1 – Ethernet monitor program for keeping track of ethernet/ip address pairings
asterisk – 1.0.7-1 – An open source PBX
...
3. ipkg install
安装软件包,有 2 种方法,例如我想安装 OpenSSH 的 SFTP 服务器(注 1),方便我以后上传文件到 OpenWrt,我可以执行 ipkg list 或到 OpenWrt 的软件包网址取得软件 SFTP 服务器的资料:
Package: openssh-sftp-server
Version: 4.0p1-1
Depends: zlib, libopenssl
Section: net
Architecture: mipsel
Maintainer: bugs@openwrt.org
MD5Sum: 145c72f82f2404b991a96bf5f3ef2262
Size: 14086
Filename: openssh-sftp-server_4.0p1-1_mipsel.ipk
Source: buildroot internal
Description: OpenSSH SFTP server
之后我可以选择第 1 个方法用软件包名来安装,这方法会自动把软件包下载并安装:
ipkg install openssh-sftp-server
或者选择第 2 个方法从网站把安装包下载到路由器上,然后输入文件名安装:
ipkg install openssh-sftp-server_4.0p1-1_mipsel.ipk
4. ipkg list_installed
这个命令会列出 OpenWrt 预先为你安装好的软件 (包括一些常用软件和驱动) 以及你后来安装的软件。
5. ipkg remove
当你的空间不足时,这个命令非常有用,你先执行 ipkg list_installed 得出己安装的软件列表,然后找出你要删除的软件包名称,例如:
ipkg remove openssh-sftp-server
注意事项:
由于 WRG54G 的空间有限,安装软件时要留意软件的大小和剩余的空间,我们可以用 df -h 命令得知 Flash Rom 和 虚拟内存的使用量:
root@Linksys:~# df -h
Filesystem Size Used Available Use% Mounted on
/dev/root 3.2M 2.8M 372.0k 89% /
none 7.0M 6.5M 540.0k 92% /tmp
/dev/mmc/disc0/part1 14.2M 7.5M 6.6M 53% /sd
结果显示我的 WRT54G 只剩下 372k 的空间,虚拟内存也只剩下 540k,因为我为我的WRT54G 加装了一张 16MB 的 SD Card,所以你会看到有一项设备 /dev/mmc/disc0/part1 剩余 6.6M 空间。
注 1: 安装了 openssh-sftp-server,你会发现 sftp 服务器并不能正常使用,为什么呢?!这时你要输入这个命令:
ln -s /usr/libexec /usr/lib
关于diy无线路由的一些知识(转载)
关于开源无线路由器的资料
由于做项目的需要和自己的爱好,最近在找关于无线路由器的资料,找到了些相关的资料,在这里总结一下。
一、无线路由器与无线AP的区别
(资料来源:详谈无线路由器与无线AP的区别)
AP为Access Point简称,一般翻译为“访问节点”,无线AP主要是提供无线工作站对有线局域网和从有线局域网对无线工作站的访问,在访问接入点覆盖范围内的无线工作站可以通过它进行相互通信。通俗的讲,无线AP是无线网和有线网之间沟通的桥梁。
当前的无线AP可以分为两类:单纯型AP和扩展型AP。
单纯型AP的功能相对比较简单,缺少路由功能,只能当无线集线器。它相当于一个无线交换机,接在有线交换机或路由器上,为跟它连接的无线网卡从路由器那里分得IP。
扩展型AP也就是市场上的无线路由器,由于它功能比较全面,大多数扩展型AP不但具有路由交换功能还有DHCP、网络防火墙和端口映射等功能。它是单纯型AP与宽带路由器的结合体;它借助于路由器功能,可实现家庭无线网络中的Internet连接共享,实现ADSL和小区宽带的无线共享接入 ,另外还可以把通过它进行无线和有线连接的终端都分配到一个子网,这样子网内的各种设备交换数据非常方便。简单地说,无线路由器就是AP、路由功能和交换机的集合体,支持有线无线主机组成同一子网,直接接上MODEM。
现在市场上的无线AP大多属于扩展型AP,它们在短距离范围内是可以相互联的;如果大家需要传输的距离比较远,那么就需要无线网桥和专门的天线等设备,其实无线网桥也是无线AP的一种。
二、理解路由的概念与原理
这里需要网络知识,可以稍微学习理解一下TCP/IP协议,以及数据链路层与网络层的交互。路由层的知识摘录如下:(资料来源:路由器原理及路由协议的基础知识)
路由器工作在OSI模型中的第三层,即网络层;同时也是TCP/IP协议的第三层,即网际层。 路由器利用网络层定义的“逻辑”网络地址(即IP地址)来区别不同的网络,实现网络的互连和隔离,保持各个网络的独立性。路由器不转发广播消息,而把广播消息限制在各自的网络内部。发送到其他网络的数据均先被送到路由器,再由路由器转发出去。
IP路由器只转发IP分组,把其余的部分挡在网内(包括广播),从而保持各个网络具有相对的独立性,这样可以组成具有许多网络(子网)互连的大型的网络。由于是在网络层的互连,路由器可方便地连接不同类型的网络,只要网络层运行的是IP协议,通过路由器就可互连起来。
网络中的设备用它们的网络地址(TCP/IP网络中为IP地址)互相通信。IP地址是与硬件地址无关的“逻辑”地址。路由器只根据IP地址来转发数据。IP地址的结构有两部分,一部分定义网络号,另一部分定义网络内的主机号。目前,在Internet网络中采用子网掩码来确定IP地址中网络地址和主机地址。子网掩码与IP地址一样也是32bit,并且两者是一一对应的,并规定,子网掩码中数字为“1”所对应的IP地址中的部分为网络号,为“0”所对应的则为主机号。网络号和主机号合起来,才构成一个完整的IP地址。同一个网络中的主机IP地址,其网络号必须是相同的,这个网络称为IP子网。通信只能在具有相同网络号的IP地址之间进行,要与其它IP子网的主机进行通信,则必须经过同一网络上的某个路由器或网关(gateway)出去。不同网络号的IP地址不能直接通信,即使它们接在一起,也不能通信。
路由器有多个端口,用于连接多个IP子网。每个端口的IP地址的网络号要求与所连接的IP子网的网络号相同。不同的端口为不同的网络号,对应不同的IP子网,这样才能使各子网中的主机通过自己子网的IP地址把要求出去的IP分组送到路由器上。
当IP子网中的一台主机发送IP分组给同一IP子网的另一台主机时,它将直接把IP分组送到网络上,对方就能收到。而要送给不同IP于网上的主机时,它要选择一个能到达目的子网上的路由器,把IP分组送给该路由器,由路由器负责把IP分组送到目的地。如果没有找到这样的路由器,主机就把IP分组送给一个称为“缺省网关(default gateway)”的路由器上。“缺省网关”是每台主机上的一个配置参数,它是接在同一个网络上的某个路由器端口的IP地址。
想要更好的学习无线路由器的技术和知识,最好的办法就是实践,搞一块无线路由的开发板。有幸的是,由于我们可敬的Linux hacker前辈们的努力,让现在许多MIPS芯片的无线路由产品变成了廉价的开发板,3、5百元有可以买到一个不错的。下面我就把搜到的资料分享一下:
三、开源的无线路由软件及相关产品
在这之后,Linux爱好者们利用这些资源发展出了很多无线路由的Linux发行版,下面介绍一下主流的无线路由的Linux发行版:
国内最早兴起刷固件行动的人基本上都是将自己的设备刷新成Open-WRT,由此可见Open-WRT的影响力。 该固件通过SSH加密协议来配置,和Cisco设备在很多指令和操作上类似,不过由于该固件的开发进度非常缓慢,新版本更新比较慢,所以它的角色已被DD -WRT等新近“崛起”的固件所取代。
该固件是国内外目前最为流行的固件之一,它是在Open-WRT固件的基础上改进后发布的,很多功能都是取自Open-WRT。在应用范围上DD-WRT支持极多硬件平台,并且新版本的发布也很及时。
所支持的硬件 源码下载(源代码在others/sourcecode/目录下) DD-WRT Wiki
以稳定著称的第三方固件,不过功能上要比前两种稍逊一筹。从核心代码上比较,它是最接近于Linksys官方Firmware的固件。对很多用户来说,新功能、新应用的出现是他们刷新固件的主要动力,如果只是单一的稳定,那么直接使用官方默认固件即可。
这是一款非常火爆、逐渐流行的固件,个头比较小,外号“番茄”,实际使用起来非常稳定(与DD-WRT比较,我同事亲身体验的),基于SVG的图形化流量图非常有特色。它是由HyperWRT研发团队中的一个组员开发的。个小功能强是它的最大特点,这也是越来越多的玩家和无线路由器发烧友脱离DD-WRT阵营转投“番茄”门下 的主要原因。
四、支持开源Linux的无线路由器产品及其购买指南
开源无线路由的硬件产品现在很多,都是MIPS核心的芯片,而且基本都是使用broadcom芯片为主CPU,并加miniPCI接口的无线网卡,flash存储器使用NOR flash,内存有大有小(小到8MB,大到128MB)。软件支持的硬件型号在发行版的网站上有说明。
但是产品哪里有售呢?买做好的产品,要是刷坏了不好办阿!所以一些商家把二手的无线路由加以改进(基本是加大RAM和Flash),并找出串口和JTAG口,引出USB口,拿裸板来卖,方便发烧友们折腾!这里我强烈建议买有引出JTAG接口的无线路由来折腾,这样比较安全,基本刷不死。
淘宝上有很多这些开发板性质的无线路由,但是最有名卖家还属恩山淘宝店铺,他们不仅有许多开发板性质的Linksys无线路由裸板,还有自己的论坛,技术支持有保证。同时您也可以在他们的论坛中的个人物品转让或求购专区中找到二手转让的板子。
经过我的搜索还有一个很强悍的无线路由开发板:RouterStation Pro,同时著名的无线设备生产商UBNT的产品,他们很值得一买,好像这个公司据说是UBNT的代理。
五、开源Linux的无线路由器刷机简要指南
对于刷机更新路由的固件,最简单的方法当然是在发行版的网站下载你所需要的刷机包(一个bin文件),通过登录路由的管理界面来更新,但设个方法可能并不能满足所有要求,特别是对于开发者来讲。
对于这些开源的Linux无线路由的所有软件都存在Nor flash里,而在flash里的内容主要有:
root@Tekkaman WRT:/dev# cat /proc/mtd
dev: size erasesize name
mtd0: 00040000 00010000 "cfe"
mtd1: 007b0000 00010000 "linux"
mtd2: 004dd400 00010000 "rootfs"
mtd3: 00010000 00002000 "nvram"
mtd4: 001f0000 00010000 "ddwrt"
(以 WRT300N Version 1.1刷上了DD-WRT为例)
cfe:Common Firmware Environment 通用固件环境,也就是嵌入是系统中的bootloader,或者电脑中的BIOS,负责初始化主板,并启动操作系统,同时具备网络功能、刷写其他分区、修改启动参数和操作主板上的硬件的能力,可以说是一个功能强大的bootloader。在这里有详细的介绍,boardcom还提供其源码(包含说明文档)和开发工具的下载。在cfe分区中存放了cfe及其使用的参数。
linux:就是存放Linux内核的分区
rootfs:就是存放Linux系统必须的根文件系统的分区。
nvram:存放路由器在进入Linux系统后,运行路由和无线控制程序所需要的参数的分区,比如拨号是所需的帐户、秘密,路由器的名字、SSID等等,几乎所有关键的参数。顾名思义,Linux把这个分区当作非易失性的ram来使用。
ddwrt:应该是DD-WRT使用的分区,但我将其备份出发现,什么数据都没有,功能我尚不明确。
对于刷机来说,首先要有刷机的原料:刷机包或者bin文件。获得这些东西一是通过发行版的网站获得,还有就是从一台已经刷好的路由中备份出来,在者就是通过源代码编译出你所要的程序。在这里我之简要介绍一下如何从一台已经刷好的路由中备份出各个分区的其中一种简单的方法:(参考的帖子)
(2)通过传口或者网口登录无线路由,并执行以下命令:
root@Tekkaman WRT:~# mount -t ramfs ramfs /mnt
root@Tekkaman WRT:~# dd if=/dev/mtd/0 of=/tmp/cfe.bin
512+0 records in
512+0 records out
root@Tekkaman WRT:~# cp /tmp/cfe .bin /mnt/
(3)通过PC机的ftp软件,下载已经在/mnt中的分区备份。
这样就简单的备份出了cfe分区。别的分区也可同样备份出来,对于DD-WRT的rootfs分区,可能可以备份出后解开镜像文件来研究,他是一个squashfs文件系统。
如果你的路由参数被破坏了,你还可以通过刷回备份的nvram分区来恢复,方法如下:
如前所诉,通过ftp发送nvram备份到路由,然后执行:
root@Tekkaman WRT:~# cd /mnt
root@Tekkaman WRT:/mnt# mtd write nvram.bin nvram
root@Tekkaman WRT:/mnt# reboot这样重启后设置的内容都恢复了,别的分区也可如此恢复。
root@Tekkaman WRT:/mnt# mtd write nvram.bin nvram
root@Tekkaman WRT:/mnt# reboot这样重启后设置的内容都恢复了,别的分区也可如此恢复。
其实以上介绍的方法就是一种可以在路由器的系统还可运行,并可登录的情况下刷机的方法:将备份出的分区直接在Linux下刷入系统。
如果你的系统被破坏了,无法启动,那就的看破坏的程度了:
(1)如果是Linux分区被破坏了,无法进入Linux系统,但可以进入cfe,那就可以通过cfe的tftp方式恢复。
这种恢复方式需要连接出路由板上的UART接口(也就是论坛上说的TTL),你必须制作一个连接线,它本质上是通过一个USB转串口的芯片来实现。其实也可以将USB转串口芯片改成232电平转换芯片(比如MAX232),然后接至电脑的串口。这些东西学过电子的朋友一定不难;但是你如果嫌麻烦,你可以在恩山论坛或者淘宝购买。
路由和PC间连接好了TTL和网线后,你就可以在路由上电时,在PC的串口工具中按住CTRL-C来进入cfe命令行模式,使用tftp的方法刷机。
(2)如果是cfe都被破坏了,那就是有通过JTAG口来恢复了。
这种方法你必须现制作一个并口的JTAG线,使用网上的brjtag.exe来操作路由,他可以在路由器的所有软件都被破坏后对路由器进行擦除、刷机和备份等操作。所以可以说他是砖机的救星,所以这也是我在开头推荐大家购买有JTAG接口的路由的原因。
以上对于两种方法,内容比较多。由于篇幅有限,以后我会在博客中详细介绍,你也可以到恩山的论坛上找资料。
六、总结
在
一个网络飞速发展的今天,了解一点网路的知识和原理是很有益的,对于一个普通的电子爱好者,对于一个电子工程师是很重要的,对于一个嵌入式系统的工程师是
必须的。而学习实践网络的好机会就是“玩”无线路由。而最好“玩”的无线路由就是开源无线路由器,从中你可以学到很多知识和技术。本文整理并介绍了一点无
线路由的基本概念、路由的运作原理、主流的开源无线路由的Linux发行版、硬件购买指南及简单的刷机指南,希望对于大家认识和学习开源无线路由有一点帮助。
Subscribe to:
Posts (Atom)


