

Last week, I wrote about DiscT@2 and Labelflash, labelling methods which utilised the laser inside a CD/DVD writer to create readable labels on the top and underside of discs. That particular system, pioneered by Yamaha and further improved by Fujifilm, was one that I had practical experience with even though it was arguably more obscure.
This post looks at the competing LightScribe system, invented by Hewlett Packard (HP) and released in 2004. This system uses an infrared laser on a specially coated media to create greyscale images on the top side of the disc. Initially only available in a “gold” colour, media was later available in a number of colours before becoming unsupported in around 2013. This process was marketed as “Burn, Flip, Burn”. I suppose as HP was a printer manufacturer, perhaps entering the optical disc printing market with this solution was seen as another way to ensure profits which wouldn’t be shared with other printer companies. Ultimately, this didn’t work out so well for them …
Getting a LightScribe Drive
I didn’t own any LightScribe capable drives during its heyday, but because I’ve had the chance to rummage and salvage from a number of HP desktops, I took home many of their optical drives which had LightScribe capability.

This particular unit is rather anonymous from the outside, as is the case for most OEM drives. It features the LightScribe logo in the centre of the tray.

This particular unit is labelled HP, but is an LG-produced drive, model GH60L produced 16th June 2010 which is only three years until LightScribe would become unsupported. It’s interesting to note that while some drives (e.g. older LiteOn units) could be crossflashed to LightScribe-capable firmware, such drives often could not burn a LightScribe label as they were missing the extra hardware that reads the optical code burned into the centre of the disc.
LightScribe Media
LightScribe media is relatively rare to find since it has been discontinued for many years, however, it is available at a significant premium on auction sites such as eBay. Instead, I’ve been lucky that in my occasional ferreting around the thrift stores, I’ve been able to pick up a few unused LightScribe blanks at anywhere from $0.50-$1.00 a disc. They’ve been a rare occasional find, but every time I come across them, I end up buying them.
The following images are taken from my “Optical Disc Corner“, where there are plenty of other retail optical discs on show.

The first one is an Imation branded CD-R. As I only have one sample of this type, I’m not going to be burning this, but the packaging is worth taking a look at just to see how it was marketed.

LightScribe’s logo is featured on the rear of the disc, although this seems to be the “one swoosh” version of the logo. This disc is made in India, with an ATIP that corresponds to Moser Baer Media.

The top surface is an ordinary dull-gold, with an ID and clocking track burned into the central area.

Instead, I will be burning one of these – a Verbatim LightScribe CD-R. This later type disc clearly notes it is a LightScribe Version 1.2 disc, as there is an upgrade to software necessary to optimise image burning to these discs. Apparently the ID code in the centre also tells the drive some parameters to use for the laser to achieve the best burn.

This disc seems to be a CMC Taiwan disc, which is a little sad. I would have rather an MCC-made Super AZO or similar, but by then, CD-Rs were beginning to decline in popularity.

I’ll also be burning one of these, which is a Verbatim LightScribe DVD+R, also of Version 1.2 type. This particular disc is an MCC-made disc from Taiwan. The top has a similar colour but the reflective nature is slightly different due to the reflective layer being behind 0.6mm of polycarbonate due to the construction of the DVD itself. The LightScribe coating is still on the top of the disc itself.

LightScribe Setup
Unlike Labelflash which was handled entirely by the end user application (in that case, Nero 6), LightScribe requires the installation of the LightScribe System Software.

![]() The software appears to be a set of libraries which are used by end-user applications to access the LightScribe functionality. I suppose this may offer a clean way to extend the LightScribe standard and features without forcing all applications to have to be rewritten. After installation, a desktop icon is created.
The software appears to be a set of libraries which are used by end-user applications to access the LightScribe functionality. I suppose this may offer a clean way to extend the LightScribe standard and features without forcing all applications to have to be rewritten. After installation, a desktop icon is created.

Clicking on the icon launches your web browser pointing to a local FAQ about LightScribe and how to use it.

It also installs the LightScribe Control Panel, which allows you to modify the contrast setting to apply enhanced contrast at the cost of burning time.


There is also some system information on your System Software version and drives, and links to various LightScribe related resources which are all broken since the official LightScribe website went offline.
To actually burn a label requires some software which can design and burn labels. I looked for some modern, free software and found out that the free CDBurnerXP supports LightScribe.

To use it, one must install it and begin a project, then access the Print Cover option. If you meet the prerequisites, you should have a “LightScribe…” button available at the bottom.

Pressing on this brings up the print options dialogue, which allows you to choose the drive, contrast level (Draft, Normal, Best) and colour of disc (which only affects the preview). An estimate of burning time is also provided. You will need to configure the cover to your liking before hitting the print button. The burn time is automatically estimated based on the size of the annulus that needs to be burned.

If you’re interesting in burning an image, like I was, then you can load the image, clear the title and set Copies to 0, so as to remove the text over the image. The image above is of a stairwell in a tower at the Chinese Gardens in Singapore, from my holiday in 2017 – there’s not that many images which work well with the centre “cut out”.

To print, the disc needs to be inserted upside down – the feeling is a little odd the first time you do it.

CDBurnerXP seems to try and identify the disc in this state and will pop up an error, but this is not an issue. Printing of the disc can be started with the “Print” button.


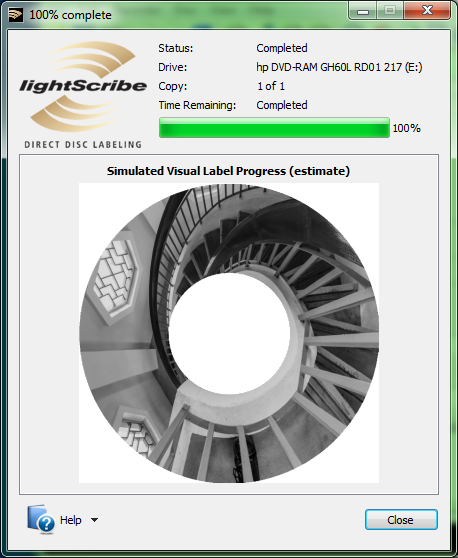
During printing, a new animated dialogue appears with an animated LightScribe logo and a simulated visual progress which shows a laser dot circling the image and the greyscale image being progressively constructed on the screen. Progress is shown in the status bar, along with estimated time remaining (which was not always very accurate). I think this is a very nice touch – it’s very visual and cool to see happening. After the burn is complete, the disc is automatically ejected.
HP also provided some official free labelling tools, including the LightScribe Simple Labeler and LightScribe Template Labeler.

LightScribe Simple Labeler begins with a splash screen that tells the user to insert a LightScribe disc into the drive label-side down.

From there, the user can enter two lines of text (no, this is not a meme we’re making) and choose a “border” which fills the space between the text. The drive and number of copies can be selected.

The next step is to preview the label. This tool is rather limiting in the sense that this type of labelling only has a very limited amount of information and doesn’t make much use of most of the surface. Clicking on the “Burn Label” button progresses to the burning screen.

This reminds us to insert a disc for burning …

… but of course, I didn’t choose to burn this label. It’s just too simple and not what I wanted. Given the rarity of the media, I wasn’t going to burn a small ring of text and call it a day.

Luckily, there is also the LightScribe Template Labeler which is a bit more sophisticated, with designs that fill the disc surface.

The three-step creation process starts with choosing a template, of which there are a few to choose from.

Towards the bottom, there is even an option to choose a blank template that allows for customisation of image and text. This allows us to burn full images, assuming you clear the text with a “space” character.

In this case, I decided to use a picture of Kinkakuji Temple in Kyoto, Japan, from my 2017 holiday as the image to be burned.


The same print options dialogue as the one shown when using CDBurnerXP is seen. Above, I show the effect of choosing the disc colour on the preview.


Likewise, the printing dialogue is the same, although this has a longer estimated time since I chose to set the drive into “enhanced contrast” mode.
LightScribe Results

My first burn as onto the CD-R, with default contrast setting on the drive and using the “Best” quality on the print dialogue. The resulting image is noticeably light and somewhat faded – compare that to the ink-printed serial in the centre of the disc.

Because of this, I decided to re-burn the image again. Because LightScribe enforces rotational alignment between subsequent burns, images were well aligned. The camera had the same manual settings and the image was processed the same way in Lightroom. The resulting image is noticeably darker, but perhaps could still do with some improvement.

A third burn seems to have produced the level of contrast I would have considered the “right” level. Because of the multiple burns, ultimately getting a label up to this contrast takes almost an hour – an eternity compared to an inkjet print, but not that dissimilar to DiscT@2 at a contrast level of 100. Of interest is that by default, the “best” setting in DiscT@2 corresponds to a contrast level of 30, which takes about 20 minutes a pass.

For giggles, I decided to burn the image a fourth time, although this seemed to have less of a visible effect. On the whole, the image quality did not get any worse – some users report that rotational alignment is not always perfect so the image could become fuzzier after reburning, but with my HP/LG drive, this didn’t seem to affect image quality in any major adverse way.

Enhancing the contrast and looking closer at the first burn, there is a noticeable “noise” pattern to the image with radial differences in darkness which remind me of inkjet nozzles that aren’t all firing quite at the right volume or timing.

After four burns, the image is noticeably more “banded” which suggests something perhaps related to positioning or laser power. This seems quite similar to the result on DiscT@2 as well.

However, unlike the result of the DiscT@2 on the data side being difficult to read unless light is hitting it at just the right angle, the viewing angle of the LightScribe print is quite good.

However, if light hits the top surface at just the right angle, contrast can be quite heavily reduced. I then decided to try burning the LightScribe DVD, and the results are a little bit different.

From the top, the image looks soft at a glance – this is because the reflective coating is 0.6mm behind the surface which is burned, thus the translucent image hangs in front. This produces a “floating” fuzzy effect on the image. On a single pass using enhanced contrast mode, the image is not too bad but perhaps still a bit light for my liking, especially if the image were to fade over time.

A second burn of the same project improves the contrast noticeably, making the dark areas quite a bit darker.

Burning a third time improves the darkness further still, but now the details in the dark areas are being lost as the image saturates. In all, I prefer the result on the CD to the DVD and it’s rather sad to see that the coating is still on the top on the DVD, where it is vulnerable to handling damage, finger oils and chemicals. In fact, this disc had some residue that I tried to wipe off prior to burning, which caused the surface to have a streaked appearance. Further wiping only increased the streakiness, so I had to stop before I potentially ruined it.
Conclusion
During the heydays of LightScribe, I remember media being available in my local shops, although at a noticeable premium. As I didn’t have any LightScribe capable burners at the time and due to the higher price of the media, I ultimately did not end up trying it. Instead, I opted for the printable disc route where necessary – it was still the more universal and cheaper option.
Now that I have had a chance to try out LightScribe, it seems it isn’t that much different from Labelflash in a number of key ways. The default “High Quality” burn times are very similar, as are the greyscale imaging limitations. While LightScribe enforces rotational alignment allowing for “incremental re-labelling”, it requires specially coated media and cannot label to the underside (data side) of a disc as a Labelflash drive in DiscT@2 mode could. Both suffer from noticeable “rings” in darkness and slight jitters in rotational positional accuracy.
LightScribe’s coating is much better than labelling discs on the data side using DiscT@2 as it is much more angle-independent and high contrast. It is available for both CD and DVD, with the coating on the top side of the disc in both cases, however the DVD print always looks a bit fuzzier as the reflective layer is 0.6mm behind the LightScribe coating. In both cases, the printed coat is exposed to handling damage, chemicals and oils. In my case, the media even had a slight powdery coat which was easily disturbed. Some users have also reported fading – which is also related to the fact that the default and enhanced contrast rarely provide the best contrast in a single burn, requiring multiple passes to make a clean image. The specialised media had not only a top coat of the LightScribe layer but also have an ID and clocking track “laser cut” into the hub area. Ultimately, this made LightScribe expensive, slow and limited. Labelflash’s coating was underneath the top coat, thus protecting it from handling damage but also limiting its application to DVDs only.
That being said, it is still a rather cool use of a disc burner’s laser, even if it was not widely commercially successful.
—
Aside
Sorry guys – the site’s a little slow and had a bit of downtime from time to time. Unfortunately, this can’t be helped (at least, without spending a lot more money) because of the limitations in terms of resources at the web host and the voracious behaviour of a number of misbehaving bots that refuse to consistently identify (so as to be blocked by user agent, something I am already doing) and refuse to honour robots.txt (or its rate limit suggestions, which I am already using to try and tame them). They also have a habit of all “coming” in at once, throwing upwards of 50-requests-per-second almost mindlessly despite providing 503s which is absolutely impossible to sensibly deal with. Some others think that it’s fun to try scanning the site with “security” (ahem hacking) tools which also mindlessly throw out silly queries in hopes of snagging themselves a vulnerability. It frustrates me a little that I am devoting much in the way of time to dealing with this, but I really don’t want to have to set my CloudFlare reverse proxy to “I’m Under Attack” mode and force everyone to do a JS challenge along with a five-second wait to access the content.
If you do reach this site when it is down, I do apologise, however there isn’t too much I can do about it … you’ll just have to try again later, perhaps 10-30 minutes later.
However, a move to something more powerful (perhaps VPS hosting) is on the way in a few years at most – after all, with about 30GB of content and now approaching 200k inodes, my “unlimited” (but not really) shared hosting is reaching its limits!