

Introduction: Openwrt on a Pc.


The little network routers you can purchase in the store are ok, but they are not upgradeable. With things changing so fast, that seems like a boon only for the router manufacturers. Also firmware upgrades quickly cease. Having a router on a pc makes more sense not only for the ability to upgrade the hardware, but you can add so many more features software wise. You are not limited by the memory or space of the boxed routers. Nothing wrong with the boxed routers for a turnkey setup. If you are like me, you want more. That is why I also use Openwrt.
This is a great project to put an old pc back to work. Openwrt is a cousin so to speak of DD-WRT that is installed on many brand name routers to increase their capabilities. Openwrt will also allow a pc to act as an expensive router without the big price tag. Of course, you could easy use some of the router distros such as ipcop and many others (see http://en.wikipedia.org/wiki/List_of_router_or_firewall_distributions). openwrt is so much more upgradeable and expandable.
Did this with the original image on a pentium2 and it worked well. If you want the gui, you may need to install the web add-on.
Installing OpenWrt x86 on a PC. (Try this at your own risk!!!)
Requirements:
An X86 compatible pc (i386) or greater with at least 16MB of RAM, 2 network cards, and a hard drive. With newer versions of openwrt require higher hardware requirements. Check openwrt.org for more details.
OpenWrt binary file, for x86.
Old:
http://downloads.openwrt.org/kamikaze/8.09.2/x86/openwrt-x86-ext2.image
Newer:
http://downloads.openwrt.org/snapshots/trunk/x86/openwrt-x86-generic-combined-ext4.img.gz (need to gunzip first) to openwrt-x86-generic-combined-ext4.img
($ gunzip openwrt-x86-generic-combined-ext4.img.gz)
Installation:
For M$ Windows, please also get physdiskwrite. [http://m0n0.ch/wall/physdiskwrite.php]
For Linux just use dd.
Grab the latest binary code from OpenWrt download site.
dd if=openwrt-x86-2.6-ext2.image of=/dev/hda (where hda and image name must be changed)
or
dd if=openwrt-x86-2.6-ext2.image of=/dev/sda (where hda and image name must be changed)
Step 1: Adding the Web Interface.

Appendices:
Howto get OpenWrt up and running with a web interface given the base image is running.
Edit the network configuration '/etc/config/network' (this assumes a static IPv4 address):
config interface loopback
        option ifname   lo
        option proto    static
        option ipaddr   127.0.0.1
        option netmask  255.0.0.0

config interface lan
        option ifname   eth0
        option type     bridge
        option proto    static
        option ipaddr   192.168.0.126
        option netmask  255.255.255.0
        option gateway  192.168.0.254
        option dns      192.168.0.16 192.168.0.2
Load the updated lan network configuration
# ifup lan
Edit /etc/ipkg.conf. Add the last line (bold)
(use the version for your openwrt. Latest version is 8.x)
src release http://downloads.openwrt.org/kamikaze/7.09/x86-2.6/packages
src packages http://downloads.openwrt.org/kamikaze/packages/i386
dest root /
dest ram /tmp
src X-WRT http://downloads.x-wrt.org/xwrt/kamikaze/7.09/x86-2.6/packages
(use the version for your openwrt. Latest version is 8.x)
Update and install webif
root@OpenWrt:~# ipkg update
root@OpenWrt:~# ipkg install webif
Update
 # ipkg update
Downloading http://downloads.openwrt.org/kamikaze/7.09/x86-2.6/packages/Packages
Updated list of available packages in /usr/lib/ipkg/lists/release
Downloading http://downloads.openwrt.org/kamikaze/packages/i386/Packages
Updated list of available packages in /usr/lib/ipkg/lists/packages
Downloading http://downloads.x-wrt.org/xwrt/kamikaze/7.09/x86-2.6/packages/Packages
Updated list of available packages in /usr/lib/ipkg/lists/X-WRT
Done.
Install webif
# ipkg install webif
Installing webif (0.3-12) to root...
Downloading http://downloads.x-wrt.org/xwrt/kamikaze/7.09/x86-2.6/packages/./webif_0.3-12_i386.ipk
Installing haserl (0.8.0-2) to root...
Downloading http://downloads.x-wrt.org/xwrt/kamikaze/7.09/x86-2.6/packages/./haserl_0.8.0-2_i386.ipk
Configuring haserl
Configuring webif
Linux OpenWrt 2.6.22 #2 Sun Sep 30 21:02:32 CEST 2007 i586 unknown
Committing new firmware id ...
Device: PC Engines WRAP
Committing new device id ...
SUCCESS! Webif^2 installation appears OK. Welcome to X-Wrt!
You may need to do a hard REFRESH to clear old CSS style from your browser.
Reinitializing httpd ...
Done.
Step 2: Adding Space.

The root partition of the official x86 OpenWrt image is not very big, about 50 MiB. Many find it too small after installing a few add-on packages. Here I will cover the steps to expand it. The resultant image can be used in a live USB (see Easy Live USB for x86 OpenWRT) or copied to a hard disk.
Procedure Outline
- Get an uncompressed disk image.
- Pad image to desired size
- Attach the image file to a loop device
- Edit image partition table to enlarge the root partition
- Resize the file system in root partition
- Detach the image from the loop device.
All commands below are run in Bash.
Uncompress Image File
Use whichever method you like to download an image file from OpenWrt (http://downloads.openwrt.org) and uncompress it using gzip. For example, these two commands download and uncompress the 10.03.1-rc6 disk image.
bash$ wget --quiet http://downloads.openwrt.org/backfire/10.03.1-rc6/x86_generic/openwrt-x86-generic-combined-ext2.img.gz
bash$ gunzip openwrt-x86-generic-combined-ext2.img.gz
Alternative, you can just copy an image file from a live USB flash drive. This will save you the trouble of restoring custom configurations.
Pad Disk Image
The next step is to use “dd” to increase the size of the disk image.
bash$ dd if=/dev/zero bs=1M count=50 >> openwrt-x86-generic-combined-ext2.img
This command appends 50 MiB of zeros to the end of the disk image: “if=/dev/zero” tells dd to copy data from /dev/zero; “bs=1M” sets the block size to 1 MiB (1024*1024 bytes); “count=50” tells dd to copy 50 blocks.
Attach to Loop Device
Note: All commands from this point to the end need to be run by a user with root privilege.
These commands find an unused loop device and attach it to the image file.
bash$ loop_dev=`losetup -f`
bash$ echo $loop_dev
/dev/loop3
bash$ losetup $loop_dev openwrt-x86-generic-combined-ext2.img
The first command uses “losetup -f” to find an unused device and stores the result in the shell variable loop_dev. The “echo” command shows the device found. Finally “losetup” attaches the device to the disk image.
Edit Partition Table
To expand a disk partition, it needs to be deleted first. A new, larger partition is then created to take its place. This new partition must start from the same sector as the old to prevent loss of data.
fdisk is used to manipulate the disk partition table.
bash$ fdisk -u=sectors -c=dos $loop_dev
The -u option asks fdisk to list partitions in sectors. The -c option tells fdisk to operate in DOS compatibility mode. $loop_dev is the loop device attached to the image file.
To see the existing partitions, type “p” at the fdisk prompt.
Command (m for help): p

Disk /dev/loop3: 107 MB, 107437568 bytes
16 heads, 63 sectors/track, 208 cylinders, total 209839 sectors
Units = sectors of 1 * 512 = 512 bytes
Sector size (logical/physical): 512 bytes / 512 bytes
I/O size (minimum/optimal): 512 bytes / 512 bytes
Disk identifier: 0x00000000

      Device Boot      Start         End      Blocks   Id  System
/dev/loop3p1   *          63        9071        4504+  83  Linux
/dev/loop3p2            9135      107855       49360+  83  Linux
fdisk shows /dev/loop3 has 209839 sectors. It also lists two partitions. The first one, /dev/loop3p1, is a small boot partition. The second, /dev/loop3p2, is the root partition. The root partition starts from sector 9135. Make a note of this number.
Now delete the root partition and create a new one that covers all available space.
Command (m for help): d
Partition number (1-4): 2

Command (m for help): n
Command action
   e   extended
   p   primary partition (1-4)
p
Partition number (1-4, default 2): 2
First sector (9072-209838, default 9072): 9135
Last sector, +sectors or +size{K,M,G} (9135-209838, default 209838): 209838

Command (m for help): w
The partition table has been altered!

The “d” command asks fdisk to delete a partition, and “2” selects the
 second partition for deletion.  The “n” command asks fdisk to create a
new partition.  “p” specifies a primary partition, and “2” selects the
second primary partition.  The first sector of this partition is sector
9135, same as the deleted partition.  Its last sector is sector 209838,
the default choice.  This is also the last sector on /dev/loop3.
Finally, the “w” command writes the new partition table through
/dev/loop3 to the disk image.
Resize Root File System
The following commands will expand the root file system to the size of the root partition.
bash$ kpartx -a $loop_dev
/dev/mapper/loop3p1: mknod for loop3p1 failed: File exists
The “kpartx -a” command creates device nodes for the partitions in the disk image. The output of “kpartx –a” (“mknod for loop3p1 failed”) seems to be a bug in my system. As far as I can tell, the creation and deletion of loop3p1 occur normally.
Another thing worth noting: kpartx and fdisk use different naming conventions. kpartx uses “/dev/mapper/device_name”, for example ”/dev/mapper/loop3p1″. fdisk uses “/dev/device_name”, such as “/dev/loop3p1″. This is because kpartx works with the device mapper.
Now run “fsck” to check the file system before resizing it. In fact, some file systems can’t be resized until they are checked.
bash$ fsck -f /dev/mapper/loop3p2
fsck from util-linux 2.19.1
e2fsck 1.41.14 (22-Dec-2010)
Filesystem did not have a UUID; generating one.

Pass 1: Checking inodes, blocks, and sizes
Pass 2: Checking directory structure
Pass 3: Checking directory connectivity
Pass 4: Checking reference counts
Pass 5: Checking group summary information

/dev/mapper/loop3p2: ***** FILE SYSTEM WAS MODIFIED *****
/dev/mapper/loop3p2: 957/6000 files (0.2% non-contiguous), 8173/49152 blocks
The “-f” option forces a run even when the file system seems clean.
Finally, resize the root file system.
bash$ resize2fs /dev/mapper/loop3p2
resize2fs 1.41.14 (22-Dec-2010)
Resizing the filesystem on /dev/mapper/loop3p2 to 100352 (1k) blocks.
The filesystem on /dev/mapper/loop3p2 is now 100352 blocks long.

bash$ kpartx -d $loop_dev
After resizing, “kpartx -d” reverses the changes made by “kpartx -a”.
Detach From Loop Device
The final step is to detach the image file from the loop device.
bash$ losetup –d $loop_dev

That’s it.  The disk image is now ready to be used in a live USB or copied to a hard disk.
Step 3: Portable Openwrt.

From: http://macbruins.wordpress.com
After creating my OpenWRT live USB (Easy Live USB for x86 OpenWRT), I wanted to use it on an older PC but ran into a problem: its BIOS does not support booting from USB. I had two choices. One was to boot up Linux from CD then switching to USB drive. The other was to get a CD bootloader that can read USB drives. Not wanting to do more work, I went searching and found Plop Boot Manager. It is very impress. Compact but full of features. It handles multiboot. It works with many bootloaders. It can boot OS on USB or CD without BIOS support. It even has a great GUI reminiscent of video arcade games. And it’s free. Do take a look.
But if you just want to get down to business, I have a ready-to-use CD image (plpbt_hiddenusb.iso on my SkyDrive). Just insert the CD and plug in your USB drive. Plop Boot Manager will do the rest.
Step 4:

Gargoyle (offshoot of Openwrt) running in as an x86 using Qemu.
Step 5: First Pc We Had With X86 Openwrt.


Update openwrt PC (x86).
More and more of the plastic routers you get from a retailer are limiting you from installling a third party firmware to make the unit more valuable. So it is nice you can put an old pc back to work and install the same kind of firmware you would put on the store bought routers. Also with the pc you can swap the nic cards for better nics without getting a whole new system.
Pulled out of the closet the pc I was using as a router and found that a few things have changed. I just went ahead and installed the latest openwrt kamikaze image on the system. What does the system have? Intel PII 266 mhz with 192 meg ram. The openwrt hard drive is only 2 gig. Thinking about using another case. The system actually has two drives. one with a minimal Debian linux to be able to get the latest image or dd (or install) to the openwrt drive. The Debian linux drive is usally left unconnected.

First thing I did was to change the dead motherboard battery. Second thing I did was change the password from the console.
There have been a few changes and a few quirks. When I cranked up the system it did not seem to see the wan (internet). so I had to do a couple of things.
# Copyright (C) 2006 OpenWrt.org
config interface loopback
option ifname lo
option proto static
option ipaddr 127.0.0.1
option netmask 255.0.0.0
config interface lan
option ifname eth0
option type bridge
option proto static
option ipaddr 192.168.6.1
option netmask 255.255.255.0
config interface wan
option ifname eth1
option proto dhcp
First I had to add the wan interface to the /etc/config/network file. Those are the last three lines. then I had to bring up the interface with: (ifup wan)
# ifup eth1
I also changed the default ipaddress of the lan from 192.168.1.1 to 192.168.6.1 so as to not interfere with my local network.
local network 192.168.1.x) > router > private network (192.168.6.x)
Then there were changes to some of the commands. You used to use ipkg, so now to update the system you would use (opkg replaced ipkg):
# opkg update
You can ssh root@openwrtbox and do everything remotey from the command line.
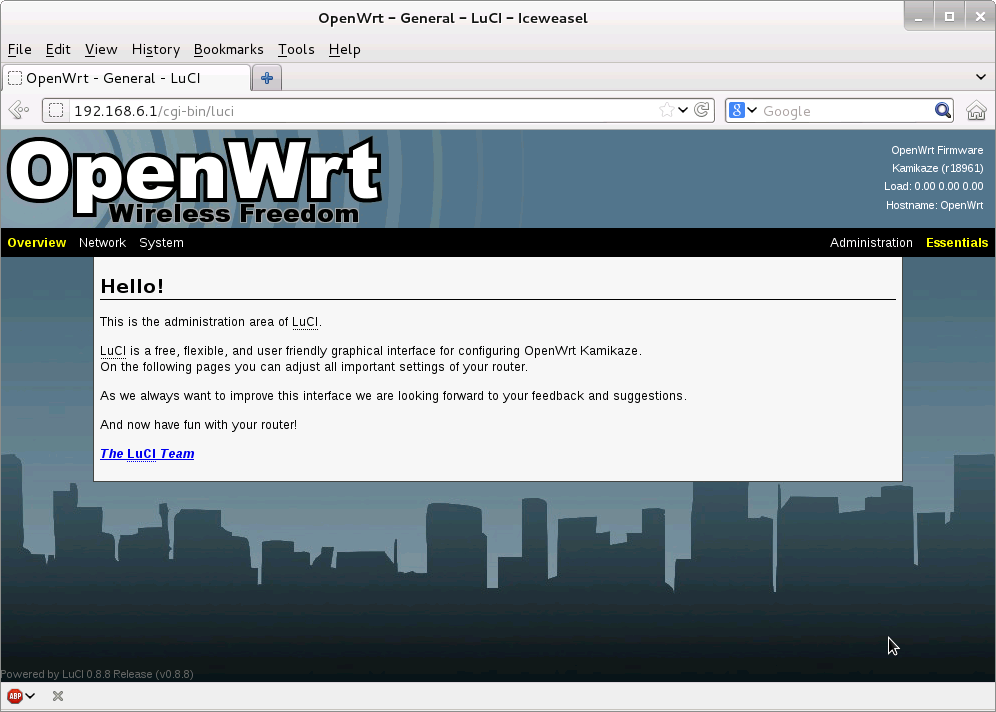
So far so good. Then I tried to access a web interface remotely. Did not work, So I had to install a web interface to the system. There are actually three to choose from. I chose Luci or the first on the list suggested in the install notes. To do that you have to add the repository (where to get the files from). So you add that repository to the /etc/opkg.conf file. In this case it was just one line or the last line in the file:
src/gz snapshots http://downloads.openwrt.org/kamikaze/8.09.2/x86/packages
dest root /
dest ram /tmp
lists_dir ext /var/opkg-lists
option overlay_root /jffs
src luci http://downloads.openwrt.org/kamikaze/8.09.2/x86/packages
Now you let the system know the file has changed, so again you do:
# opkg update
The you need to install the web interface. There are quite a few modules you can install, but I just did the basic interface. You can add more later.
# opkg install luci-web
At this point it would not hurt to do a reboot. You should then be able to see the router's web page.
Note: Some people say that using a pc for a router has much better throughput that the plastic store bought routers. Your mileage may very.
Step 6: Almost Embeded

Probably will replace the hard disk with compact flash to reduce energy comsumption and not have to worry about a hard drve moving parts wearing out
Step 7: Hotspot.

I do not know the pc version of open wrt has drives for a lot of pc cards, but I was able to at least use the following to see if the pc version woul take the install.
http://www.hotspotsystem.com/installation-guide-openwrt

![Tim's Mechanical Spider Leg [LU9685-20CU]](https://content.instructables.com/FFB/5R4I/LVKZ6G6R/FFB5R4ILVKZ6G6R.png?auto=webp&crop=1.2%3A1&frame=1&width=306)


