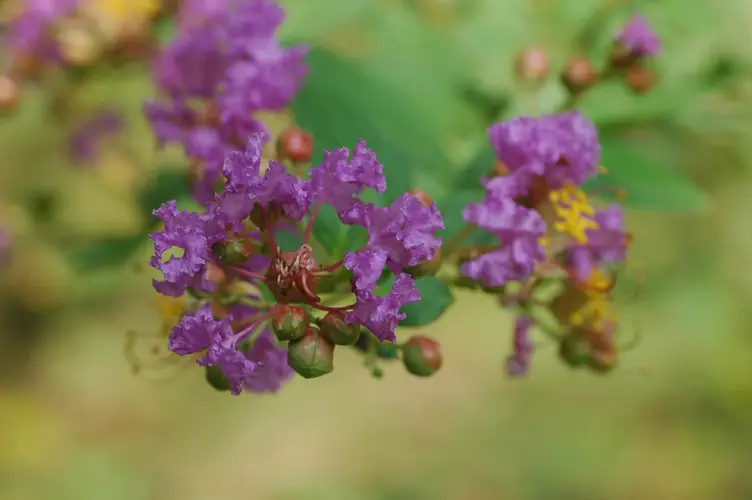
What's the best method to water my Crepe myrtle?
You might want to put a garden hose at the plant base to ensure that you're promoting excellent root development. Avoid directly spraying the leaves, and know that the leaves will require more watering if they are outdoors and facing direct sunlight. You can also use bubblers that you can put on to each plant to moisten the roots. Also, use soaker hoses that can cover the entire garden or bed when adding or removing plants to push the roots deeply. Drain any excess water and wait for the soil to dry before watering. Water at ground level to prevent diseases. On a sunny day, you might want to spray the entire bush with water. Whether potted or in-ground, please remember Crepe myrtle prefers deep watering over light sprinkling.
![more]()
What should I do if I water Crepe myrtle too much/too little?
An overwatered Crepe myrtle can start to have leaves that turn yellow, drop off and wilt. The plant can also look dull and unhealthy, with signs of mushy stems. When they are beginning to show these signs, it's best to adjust your schedule whenever possible. The wilting can also be a sign of under watering as well. You might see that the leaves begin to turn crispy and dry while the overwatered ones will have soft wilted leaves. Check the soil when it is dry and watering is not enough, give it a full watering in time. Enough water will make the Crepe myrtle recover again, but the plant will still appear dry and yellow leaves after a few days due to the damaged root system. Once it return to normal, the leave yellowing will stop . Always check the moisture levels at the pot when you have the Crepe myrtle indoors. Avoid overwatering indoors and see if there are signs of black spots. If these are present, let the soil dry in the pot by giving it a few days of rest from watering. Overwatering can lead to root rot being present in your plant. If this is the case, you might want to transfer them into a different pot, especially if you see discolored and slimy roots. Always prevent root rot as much as possible, and don't let the soil become too soggy. You should dig a little deeper when you plant your Crepe myrtle outdoors. When you check with your fingers and notice that the soil is too dry, it could mean underwatering. Adequate watering is required to help the plant recover.
![more]()
How often should I water my Crepe myrtle?
The Crepe myrtle likes deep and infrequent watering. You would want to soak them in a gallon of water each time, especially when they are planted in pots. The water storage of flower pots is limited and the soil will dry out faster. Watering is required every 3 to 5 days when living in a cold region. Water it early in the morning when the soil is dry, outdoors or indoors. You can also determine if watering is needed by checking the soil inside. When the top 2-3 inches of soil is dry, it is time to give the plant a full watering. During hot days, you may need to check the moisture daily, as the heat can quickly dry out the soil in the pot. Irrigation of the soil is also required if you have a garden. When you live in a hot climate, you might want to water once a week. Only water when you notice that about 2 to 3 inches of soil become too dry outdoors or indoors. Consider the amount of rainwater on the plant and ensure not to add to it to prevent root rot.You may not need additional watering of the plants if there is a lot of rainfall.Crepe myrtle generally grows during spring and fall. When they are outdoors, you need to add mulch about 3 to 4 inches deep to conserve more water. You need to water the plants more frequently in sandy soil because this type tends to drain faster. However, with the clay one, you need to water this less frequently where you could go for 2-3 days to dry the plant and not develop any root rot. You could mark the date on the calendar whenever you water and when you notice that the leaves are starting to droop. This can mean that you might be a day late.
![more]()
How much water do I need to give my Crepe myrtle?
The Crepe myrtle generally needs about a gallon of water each schedule,With the potted plants, you might want to water them deeply until you see that the water is dripping at the bottom of the pot. Then, wait for the soil to dry before watering them again. You can use a water calculator or a moisture meter to determine the amount you've given to your plant in a week. Provide plenty of water, especially in the flowering period, but let the moisture evaporate afterwards to prevent root rot. If Crepe myrtle is planted outdoor with adequate rainfall, it may not need additional watering. When Crepe myrtle is young or newly planted, make sure it gets 1-2 inches of rain per week. As Crepe myrtle continues to grow, it can survive entirely on rainfall. Only when the weather is too hot, or when there is no rainfall at all for 2-3 weeks, then consider giving Crepe myrtle a full watering during the cooler moment of the day to prevent the plant from suffering from high heat damage. Additional watering will be required during persistent dry spells.
![more]()
Should I adjust the watering frequency for my Crepe myrtle according to different seasons or climates?
The Crepe myrtle needs outdoors come from rain, with only persistent dry weather requiring watering. Throughout the spring and fall growing seasons, the soil needs to be kept moist but not soggy, and alternating dry and moist soil conditions will allow the Crepe myrtle to grow well. Throughout the summer, hot weather can cause water to evaporate too quickly, and if there is a lack of rainfall, you will need to water more frequently and extra to keep it moist. Usually, the Crepe myrtle will need less water during the winter. Since the Crepe myrtle will drop their leaves and go dormant, you can put them into a well-draining but moisture-retentive soil mixture like the terracotta to help the water evaporate quicker. Once your Crepe myrtle growing outdoors begins to leaf out and go dormant, you can skip watering altogether and in most cases Crepe myrtle can rely on the fall and winter rains to survive the entire dormant period. After the spring, you can cultivate your Crepe myrtle and encourage it to grow and bloom when the temperature becomes warmer.This plant is not generally a fan of ponding or drought when flowering. You must ensure that the drainage is good at all times, especially during the winter. When the plant is in a pot, the plant has limited root growth. Keep them well-watered, especially if they are planted in pots during summer. They don't like cold and wet roots, so provide adequate drainage, especially if they are still growing. It's always best to water your Crepe myrtle’s diligently. Get the entire root system into a deep soak at least once or twice a week, depending on the weather. It's best to avoid shallow sprinkles that reach the leaves since they generally encourage the growth of fungi and don't reach deep into the roots. Don't allow the Crepe myrtle’s to dry out completely in the fall or winter, even if they are already dormancy. Don't drown the plants because they generally don't like sitting in water for too long. They can die during winter if the soil does not drain well. Also, apply mulch whenever possible to reduce stress, conserve water, and encourage healthy blooms.
![more]()
What should I be careful with when I water my Crepe myrtle in different seasons, climates, or during different growing periods?
If planting in the ground, Crepe myrtle mostly relies on rain. However, if there is no rainfall for 2-3 weeks, you may need to give proper consideration to giving the plants a deep watering. If watering Crepe myrtle in summer, you should try to do it in the morning. A large temperature difference between the water temperature and the root system can stress the roots. You need to avoid watering the bushes when it's too hot outside. Start mulching them during the spring when the ground is not too cold. The age of the plants matter. Lack of water is one of the most common reasons the newly planted ones fail to grow. After they are established, you need to ease off the watering schedule. Reduce watering them during the fall and winter, especially if they have a water-retaining material in the soil. The dry winds in winter can dry them out, and the newly planted ones can be at risk of drought during windy winter, summer, and fall. Windy seasons mean that there's more watering required. The ones planted in the pot tend to dry out faster, so they need more watering. Once you see that they bloom less, the leaves begin to dry up. Potted plants are relatively complex to water and fluctuate in frequency. Always be careful that the pot-planted plant don't sit in the water. Avoid putting them in containers with saucers, bowls, and trays. Too much watering in the fall can make the foliage look mottled or yellowish. It's always a good idea to prevent overwatering them regardless of the current climate or season that you might have. During the months when Crepe myrtle begins to flower, you might want to increase the watering frequency but give it a rest once they are fully grown. Give them an adequate amount of water once every 3 to 5 days but don't give them regular schedules. Make sure the soil is dry by sticking your finger in the pot, or use a moisture meter if you're unsure if it's the right time. Too much root rot can cause them to die, so be careful not to overwater or underwater regardless of the climate or season you have in your area.
![more]()
Why is watering my Crepe myrtle important?
Watering the Crepe myrtle helps transport the needed nutrients from the soil to the rest of the plant. The moisture will keep this species healthy if you know how much water to give. The watering requirements will depend on the weather in your area and the plant's soil. The Crepe myrtle thrives on moist soil, but they can't generally tolerate waterlogging. Ensure to provide enough mulch when planted on the ground and never fall into the trap of watering too little. They enjoy a full can of watering where the water should be moist at the base when they are planted in a pot to get the best blooms. If they are grown as foliage, you need to water them up to a depth of 10 to 20 inches so they will continue to grow. If it's raining, refrain from watering and let them get the nutrients they need from the rainwater.
![more]()
Does my Crepe myrtle need to be pruned?
While one could technically let the Crepe myrtle go without pruning, the form and health of the tree may suffer, and will end up looking quite shaggy and unorganized. Crepe myrtle is grown for its attractive flowers. While not strictly necessary, many people prefer to prune this plant every year or two to encourage flowering and to maintain an attractive appearance and keep your Crepe myrtle in great shape. Pruning not only helps the tree relieve itself of burdens like dead wood and disease, but it also gives you the creative ability to style the tree in a way that works for you!
![more]()
When is the best time to prune my Crepe myrtle?
There are ultimately two times of the year that work best for pruning Crepe myrtle. Although it can be pruned at any time in cases of emergency, such as a broken branch, pruning should be left to the seasons where Crepe myrtle isn’t actively blooming or putting on new growth. This is a very typical pruning rule for most woody plants. Pruning can either take place just before the tree begins to put on new growth in very early Spring, or it can wait until just after all the blooms have fallen and your Crepe myrtle is starting to fall into dormancy. The best time to prune is just before new growth appears, but either time is great for removing extra growth. Use garden shears to cut off broken, dead, weak or diseased branches from Crepe myrtle. Observe the branch to see if it is dry and brittle. You can also tell if a dead branch is present by its color. If the branch is dark green, it is weak and dying; if the branch is brown, then the branch is already a dead branch. You can also choose to prune at both times in the same year if your Crepe myrtle needs a bit of an overhaul. To avoid taking off too much at one time, you can simply prune back before new growth, and then again once it’s had its time to bloom and pollinate. Of course, pruning does come with some mild risks, so it’s better to prune only once per year if you can. Finally, you may prefer to just trim off dead or damaged portions of the plant, including deadheading spent flowers, to keep it looking its best. This can be done at any time of year. Diseased or damaged stems should be cut right at the soil line and removed completely. Blooms should be cut off just below the flower head.
![more]()
How can I prune my Crepe myrtle?
To prune the Crepe myrtle, first identify how the tree has grown thus far. It can either look bushy, like a shrub, or it can have one or more trunks that stem up from the ground with foliage in the top quadrant. If you have a bushy Crepe myrtle and you like it that way, then you can simply trim just as you would an average shrub, by removing new growths at equal heights just above a leaf node. For taller Crepe myrtle, there’s a little more to it. Identify the look you want first. If all you’re looking for is a quick prune and done, then all you really need to do is cut back any growth that is growing towards the inside of the canopy, as well as any “suckers”, or stems that grow below the canopy line. In this case, it is necessary to prune in winter, giving priority to the reduction of dead and dry branches. Afterwards, the crossed and parallel branches are pruned off, which increases the space for other branches to grow. In this case, it is necessary to prune in winter, giving priority to the reduction of dead and dry branches. Afterwards, the crossed and parallel branches are pruned off, which will increase the space for other branches to grow. If what you need is to take off some serious area, then more planning is in line. Crepe myrtle branch out in a fan fashion from the center trunk, and each branch will have its own branches that grow from them, as well. Try to take off branches that are pointing downward at their bases, but avoid cutting too much away from each secondary branch. From here, you can do some milder pruning around the areas where you removed branches in order to clean up the look and blend in the newly trimmed sections. Never trim off so much that no secondary branches are left from the main trunk; Crepe myrtle can tolerate this, but it takes years for them to recover fully. These prunings need to be done in late winter or early spring. Pruning Crepe myrtle encourages flowering and provides Crepe myrtle with more ornamental value. Finally, you may prefer to just trim off dead or damaged portions of the plant, including deadheading spent flowers, to keep it looking its best. This can be done at any time of year. Diseased or damaged stems should be cut right at the soil line and removed completely. Blooms should be cut off just below the flower head.
![more]()
What should I do after pruning my Crepe myrtle?
You can take a few extra steps to make sure that your pruning is both successful and healthy. As with most woody, flowering trees, Crepe myrtle should be spoiled with a little extra water over the following week so that it has the means to heal its wounds. Crepe myrtle is a tough cookie, so it can take care of itself for the most part after the annual snipping. You can also fertilize just before or after pruning, which gives Crepe myrtle a little vitamin boost that can provide it the nutrients needed to better protect itself from any nearby pathogens or diseases. If you have other plants or trees nearby that are affected by diseases such as fungi or pests, you can also apply honey to the wounds just after pruning to create a sort of natural bandage.
![more]()
What techniques and tips should I use when pruning my Crepe myrtle?
Pruning the Crepe myrtle should be saved until the tree is mature, or has at least one thick stem or trunk that other, smaller branches grow from. That being said, you can train younger Crepe myrtle to grow in a style that you like by snipping off new growths at the base of the tree where it meets the ground. Here’s a general idea of how to get started pruning your Crepe myrtle. Tools For pruning, you’ll of course need some sort of clippers. Loppers are best for thicker branches, while hand pruners will usually get the job done on smaller branches that are less than the thickness of your average pencil. You’ll also need a good pair of gloves, as well as some sort of protective eyewear. Pruning can sometimes get a little pokey, so you want to make sure that none of the stray branches or debris end up in your eyes.
![more]()
What are the common issues that I should be aware of when pruning my Crepe myrtle?
One of the most common issues with Crepe myrtle is overgrowth. Once they get unruly, it can be tricky to get them to look their best again. In some situations, it may be best to cut away everything except for secondary branches- those that grow from the main stem or trunk- and henceforth only trim back new branches liberally until your Crepe myrtle regains its shape.
![more]()
How much/long should Crepe myrtle get sunlight per day for healthy growth?
For healthy growth, make sure that Crepe myrtle receives at least 3–6 hours of sun each day. This is actually a minimum requirement—most plants that can handle part sun can also thrive in full sun, but because they require less light for photosynthesis, they are more flexible than plants that require full sun or part shade.
![more]()
What type of sunlight does Crepe myrtle need?
Crepe myrtle does best with exposure to full or part sun. They will perform best with direct morning light, but in summer they need protection from the strong afternoon sun. In temperate environments, too much hot afternoon sun can burn the leaves, damaging the plant's appearance and health.
![more]()
Can sunlight damage Crepe myrtle? How to protect Crepe myrtle from the sun and heat damage?
Crepe myrtle planted indoors can easily be damaged by direct sunlight when it's moved outdoors. The best way to prevent sunburns from overexposure is to move pots gradually from a shaded area to a brighter spot, gradually. But even plants that are acclimated to the summer sun can be damaged by extreme heat. In a heatwave, it is important to keep the soil consistently moist so that plants can cope with excessive levels of heat. Moving plants in containers to areas with afternoon shade or erecting a shade cloth over them can protect sensitive Crepe myrtle during extreme weather events.
![more]()
Does Crepe myrtle need to avoid sun exposure? / Should I protect Crepe myrtle from the sun?
While bright morning sun and some full sun exposure can be highly beneficial for Crepe myrtle, the harsh, hot midday sun of summer can be too much to handle. If planted in the ground, the summer sun will usually ramp up slowly enough through the season for Crepe myrtle to gradually adapt to its intensity. But a potted plant that has been indoors or in a protected location will often suffer injury when placed suddenly into a location where the direct summer sun reaches it in the hottest part of the day. To protect this plant from the brutal afternoon summer sun, plant or place it in an understory location where it is shaded at midday by taller trees and plants or by a building or landscape feature.
![more]()
What will happen if Crepe myrtle gets inadequate sunlight?
When Crepe myrtle receives too little sun, they may become pale green or display drooping, yellow leaves. While some leaf drop is normal, if leaves are dropping but no new ones are growing in to replace them, it is a sign that something is wrong. If Crepe myrtle receiving inadequate light does manage to grow, the new growth is often spindly, pale, and prone to insect infestation. Paying attention to these signs and changing the lighting conditions of the plant will make a significant difference.
![more]()
Does Crepe myrtle need special care about sunlight during its different growth stages?
Tender, new leaves are especially sensitive to sunburn. Bearing this in mind, very young Crepe myrtle and when it's in a strong growth phase, such as in late spring and early summer, will be more sensitive to harsh sun and heat than the mature one or those in a more dormant fall growth stage. Crepe myrtle fresh from a nursery is also usually not prepared for strong full sunlight and must be introduced to it slowly.
![more]()
Are there any cautions or tips for sunlight and Crepe myrtle?
Recently transplanted Crepe myrtle will often experience a bit of shock and will need to be cared for carefully, either shaded from bright afternoon sun or placed in a protected area. On very hot days, you may see the leaves of Crepe myrtle drooping—this is usually nothing to worry about. Plants will send the water in their leaves down into their roots to protect them from burning. However, if the leaves are still drooping in the evening or the next morning, the plant needs water. Always avoid watering during the hottest times of day, as sunlight can hit wet leaves and scorch them easily. Crepe myrtle that has been underwatered will be weaker than that with consistently moist soil. This can leave it with weak roots that are unable to protect the leaves on hot, sunny summer days by diverting water away from the leaves. Care for an underwatered plant by giving it a long, deep watering and then allowing the top two inches of soil to dry out before the next watering. Even if it loses its leaves, if cared for properly it will grow new ones.
![more]()
What is the optimal temperature for Crepe myrtle?
The best temperature for Crepe myrtle to thrive is 65~80℉(18~27℃). During the primary growing phase, the highest temperature tolerable would be 95℉(35℃), while the lowest tolerable temperature would be 15℉(-10℃). This species is tolerant of low temperatures and will survive freezing winters. The perfect, highest, and lowest temperature range: Perfect:65~80℉(18~27℃) Highest:85~95℉(30~35℃) Lowest:-5~15℉(-20~-10℃) or below
![more]()
Should I adjust the temperature for Crepe myrtle during different growing phases?
Research shows that Crepe myrtle will begin to exhibit signs of stunted growth during prolonged periods of higher temperatures, especially during the development of axillary buds and the growth of main shoots. Keeping the temperatures consistent and cooler, around 65℉(18℃), will encourage vigorous growth after germination or transplanting.
![more]()
How can I keep Crepe myrtle warm in cold seasons?
Crepe myrtle can withstand freezing temperatures when planted in the ground in areas that don’t get below of 15℉(-10℃) as an extreme temperature during the winter months. But if planted in pots or containers, then their roots must be protected from the winter cold. Do this by wrapping the container in a blanket or bringing it inside where it will be fully protected from the elements.
![more]()
What damage will Crepe myrtle suffer if the temperature is too high/low?
Greater harm will come to Crepe myrtle if the temperature is consistently too high versus too low. If Crepe myrtle gets too hot, seed germination and photosynthesis efficiency is lessened due to hormone triggers caused by heat stress. The plant will show signs through wilting, leaf browning, and potentially death. If Crepe myrtle gets too cold, plant functions such as nutrient uptake and photosynthesis will cease, resulting in the possible death of the plant. If a single freezing event occurs during the growing season, then a membrane phase transition might occur, which can cause a cease in plant functions and death of the plant.
![more]()
What tips and cautions should I keep in mind when it comes to temperature for Crepe myrtle?
Keeping the soil temperature consistent is one of the most important strategies to keeping Crepe myrtle healthy, which leads to successful budding, flowering, and new growth. Do this by consistently watering, adding mulch to bare soil, and planting in the shade.
![more]()
How can I keep Crepe myrtle warm without a heat pad?
Due to the cold tolerance of Crepe myrtle, heating pads will not be necessary if planted outside in the ground. If the plant is in an outdoor pot, then bring it inside a heated house and place it in a sunny window during the winter months.
![more]()
How can I provide Crepe myrtle with an adequate temperature condition?
To ensure adequate temperature conditions are present, plant Crepe myrtle in an area with partial shade. If possible, use afternoon shade to provide the best protection during the hottest part of the day. This will also result in lower temperatures in the soil due to increased moisture retention. If Crepe myrtle is planted indoors, then keep the container away from windows and out of direct sunlight during the summer months to prevent the soil temperature from spiking daily.
![more]()
How can I save Crepe myrtle from temperature damage?
During the summer or times of high heat, give Crepe myrtle extra shade and water to help cool its leaves, roots, and soil. During cold snaps or growing season freezes, cover sensitive budding vegetation with frost cloth or water using sprinkler systems. If it’s only nearing freezing temperatures for a short period, then water during the day several hours before the freeze. If the temperature is predicted to remain below freezing for an extended period, then keep the sprinkler running until the temperature rises above freezing the following day.
![more]()
Should I adjust the temperature for Crepe myrtle in different seasons?
Crepe myrtle is a mid-temperature plant that can easily tolerate the typical fluctuations of the seasons and remain a hardy species when planted in maintained landscapes areas, containers, or indoors. Therefore, adjusting the temperature during the different seasons is unnecessary for primary growth. If flowering is stunted or impeded, then allowing the plant to experience a season of winter freeze could help to revive flowering.
![more]()
Under what conditions should I stop adjusting the temperature for Crepe myrtle?
If it becomes too difficult to lower the temperature for an indoor plant during the summer, then plant it outside in the ground or in a container. Make sure to plant Crepe myrtle in a shaded location and water often to keep the soil moist.
![more]()
Why do I need to fertilize my Crepe myrtle?
You need to fertilize a Crepe myrtle for a few important reasons. The most obvious of these reasons is that fertilizer will help your Crepe myrtle produce lovely blooms. Fertilizing in early spring is one of the best ways to ensure that your Crepe myrtle has excellent flowers during that season. Fertilizer also gives your Crepe myrtle plenty of energy that it can store in the ground during its dormant growth phases. Giving your Crepe myrtle some extra nutrients during the fall planting process or during the late spring will help your Crepe myrtle hold more energy to use once active growth resumes.
![more]()
When is the best time to fertilize my Crepe myrtle?
Timing is crucial when it comes to fertilizing Crepe myrtle. If you use fertilizer too early while the Crepe myrtle is still dormant at this time. This fertilizer cannot be used effectively and will be washed away by rainwater, causing waste and pollution. The first application of fertilizer should be applied in the early spring. Continue fertilizing once a month until early summer.
![more]()
When should I avoid fertilizing my Crepe myrtle?
Avoid giving Crepe myrtle a fertilizer with too much nitrogen, since this can lead to development of plenty of leaves but not many blooms. Look for fertilizer with a lower level of nitrogen compared to other nutrients. Do not fertilize after the early autumn, which can cause too much growth just before winter. Also, Crepe myrtle should not be fertilized during hot and dry times of year, since dry soil does not deliver fertilizer as effectively as moist soil. Fertilizing at this time can also stimulate growth which in turn needs more water that may not be available. It is best to keep fertilizer for earlier in the season when temperatures are cooler. Finally, remember that Crepe myrtle can absorb fertilizer that has been applied to nearby plants or lawns, so be cautious about inadvertently giving tree/shurb a double-dose of fertilizer.
![more]()
What type of fertilizer does my Crepe myrtle need?
The ideal fertilizer for a Crepe myrtle is one that has a relatively balanced mix of the three main plant nutrients, with slightly higher amounts of phosphorus. Alternatively, some gardeners choose to improve their Crepe myrtle 's soil by adding organic materials such as compost, worm castings, and manure. Some experienced gardeners will supplement 1-2 times with water-soluble fertilizers containing phosphorus when the flower buds start to appear. This will help the flowers develop better and allow them to grow larger and bloom longer. Fertilizers can come in many forms, and most of these forms will work well for your Crepe myrtle. However, some of the best fertilizers for Crepe myrtle come in either a liquid or a powdered form. Regardless of which you use, you should ensure that you dilute your fertilizer and apply it while watering your Crepe myrtle.
![more]()
How do I fertilize my Crepe myrtle?
Always follow directions for the specific type of fertilizer and do research on how to use it for the Crepe myrtle you are growing. It is important not to over-fertilize your Crepe myrtle, so determining the correct amount to use is crucial. The usual rule of thumb is to use the age of the tree (if known) or the diameter of the trunk to understand how much fertilizer should be used. Estimate a one-tenth of a pound of fertilizer per year or per inch of trunk, with a maximum of one pound. Granular fertilizers and organic fertilizers such as blood meal are applied by sprinkling the substance around the base of the tree all the way to the drip line (the space below the farthest-reaching branches) but do not let fertilizer come in contact with the trunk. Over time, the granules break down and filter into the soil to be absorbed into the roots. After fertilizing, spread an inch-deep layer of compost around the base of the tree and water thoroughly.
![more]()
What happens if I fertilize my Crepe myrtle too much?
It is far better to under-fertilize than over-fertilize, since you can always add more but you cannot easily take away excess fertilizer. Over-fertilizing your Crepe myrtle may cause brown leaf tips and edges, yellowing, wilting leaves, and possibly a visible crust of fertilizer salts on the surface of the soil around the tree. This condition is called fertilizer burn and results from too many accumulated salts in the plant’s cells. If excess nitrogen is the issue, the Crepe myrtle will produce a lot of leaves but won’t grow much flowers since nitrogen supports foliage growth. If you have overfertilized, you could try removing the top layer of soil under the Crepe myrtle to remove the most concentrated area of fertilizer. Then flush the area by watering heavily to try to get rid of fertilizer around the roots.
![more]()